Panel Page
Firewall Forward
Interior Installation
11/28/98; installed brakes and wheelpant mounting plates.
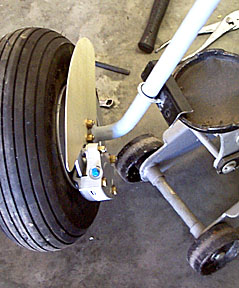
Here is the completed (less brake line) brake installation. I added a
washer to each spacer so there would be more clearance between the mounting plate and the
brake rotor.
There are several ways to install stuff backwards and upside down (don't
ask....suffice it to say that the second brake took one-fourth the time to install...).
You will need to move one of the bleeder valves to the "top" of
the caliper. Yes, the wheelpant mounting plate points "forward" (caliper is aft
of the axle). Also note the jack point. It is simply a piece of angle and a 1.25"
hardware store U-bolt.
11/29/98; 1.5 hrs; installed brake fittings; installed fittings in fuel
valve.
12/11/98; 2.0 hrs; installed fuel and vent lines.
12/12/98; 1.5 hrs; prepared canopy for fabrication of fiberglass fairing.
12/14/98; .5 hrs; applied fillet of Super Fil to front of canopy.
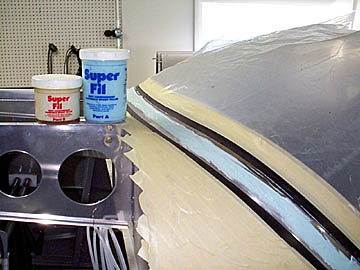 Super Fil is a PolyFiber product. It is a sandable, very
lightweight filler with an epoxy base. It mixes to create a paste that can be buttered
into place without running. Setup time is about twelve hours at 77 degrees. I am using it
to form a fillet between the canopy and skin. Fiberglass tape and resin will be applied
over the fillet. Electrical tape was applied to define the edge of the fiberglass fairing
and protect the canopy from sanding damage. Super Fil is a PolyFiber product. It is a sandable, very
lightweight filler with an epoxy base. It mixes to create a paste that can be buttered
into place without running. Setup time is about twelve hours at 77 degrees. I am using it
to form a fillet between the canopy and skin. Fiberglass tape and resin will be applied
over the fillet. Electrical tape was applied to define the edge of the fiberglass fairing
and protect the canopy from sanding damage.
12/21/98; 1.25 hrs; sanded Super Fil and made fiberglass lay-ups on canopy
leading edge.
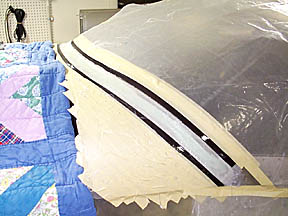
12/23/98; 2.0 hrs; sanded fiberglass; remasked; applied Super Fil.
I sanded the edges of the fiberglass lay-up down to the black tape. The
black tape was removed and reapplied 0.25" outside of the original position. This
allowed room to feather the edges of the fiberglass.
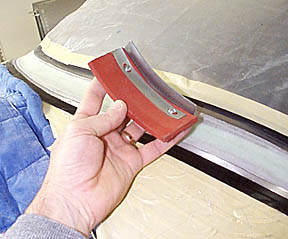
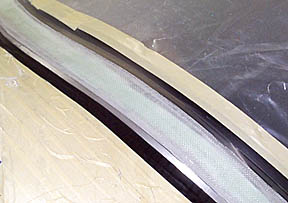
Here is the squeegee that will be used for the top coat of Super Fil.

You can see how the squeegee can be forced to follow the contours of the
fairing. I applied Super Fil and pulled it down level to the electrical tape masking...
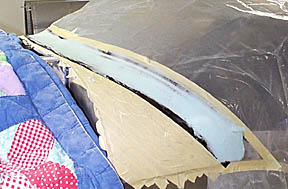
...like this. All that remains is sanding, filling minor imperfections,
resanding, and finishing up with glazing putty. The whole works will be sanded down to the
black tape which will result in a nearly flush finished edge.
12/24/98; 1.5 hrs; sanded Super Fil down to black tape and applied another
skim coat.
12/26/98; 3.5 hrs; sanded filler on canopy; remade forward fuse skin (I
didn't like the way the first one fit around the canopy).
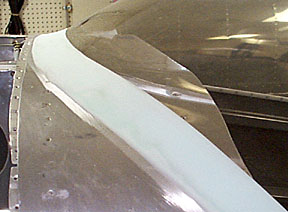
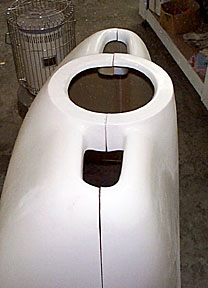
The almost finished results. There are still a couple of minor low spots
to fill, but this will do it until paint time. The edges were feathered into the canopy
deck, and the edge on the canopy is only the thickness of one layer of electrical tape;
The overall effect is of flush edges.
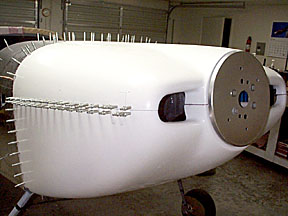
1/1/99; 0.5 hrs; used clamps and heat gun to reform cowl.
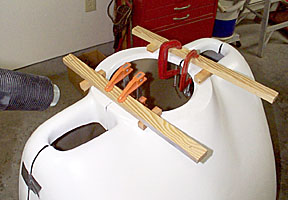 The cowl surface in the spinner area was really warped. I clamped
the surfaces to allow for some springback and heated them with a heat gun. After cooling,
the clamps were removed and the surfaces aligned much better. There are still serious
problems to address at the outside corners of the front of the cowl. The cowl surface in the spinner area was really warped. I clamped
the surfaces to allow for some springback and heated them with a heat gun. After cooling,
the clamps were removed and the surfaces aligned much better. There are still serious
problems to address at the outside corners of the front of the cowl.
1/6/99; 1.75 hrs; riveted canopy rain seal flange to forward bulkhead;
made cutouts for instruments to protrude through forward bulkhead.
1/7/99; 3.0 hrs; trimmed cowl to improve fit; made Lexan inspection
covers; modified fuel valve mounting bracket.
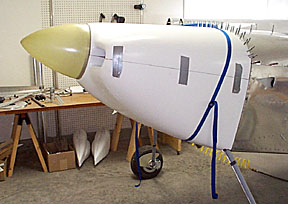
The outside corners of the cowl had serious misfit problems. On
one side, the gap between halves was over 1/2". I decided to make parallel 1/4"
trims on both sides of the cowl. This went a long way toward getting the cowl to fit
properly. It now matches well enough to begin fitting to the fuse.
For a change of pace, I fabricated a Lexan window for the wing inspection cover that
fits over the Navaid installation. This will allow preflight inspection of the linkage.
A Lexan inspection cover was also made for the elevator pushrod access
cover at the aft end of the fuse.
Highly recommended modification:
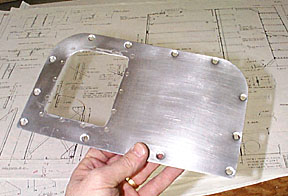
The flanges were removed near the center of the seat pans so the fuel
valve bracket can be mounted beneath the pans. This will allow the pans to be removed
without disturbing the bracket or control console.
This mod requires the platenuts to be mounted on the bracket instead of
the pans. I used AN423AD3-3 rivets to fill the rivet holes in the floor pans.
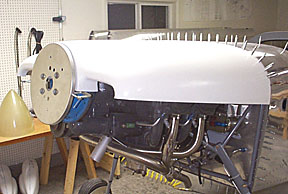
1/8/99; 7.5 hrs; mounted top half of cowl; fabricated and riveted firewall
hinges for bottom half of cowl.
1/12/99; 3.5 hrs; trimmed and fitted lower cowl half.
The trimming instructions in the manual worked well. Fortunately I had
enough cowl material at the split line to cut out the gross misalignment that cowl had as
delivered. Duct tape and a packing strap served as third and fourth hands.
Ah yes, another big hurdle jumped!
The fit of the cowl turned out better than expected.
I have no explanation....
1/16/99; 1.5 hrs; riveted hinges to upper and lower cowls
1/18/99; 1.0 hrs; riveted more hinges to lower cowl.
Forward to Finish Kit, page four
Back to Finish Kit, page two
Back to RV6 Home Page
Please submit all questions and comments to sbuc@hiwaay.net
|

