Sam Buchanan's RV6 The Panel |
 |
|||
Page One
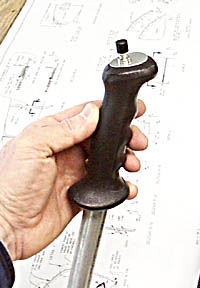
2/21/99; .75 hrs; fabricating stick grips and PTT switch.
Here is the completed pilot stick with PTT switch. The grip is a Subaru "Brat" automotive item. The Brat was a 70's-80's pickup with two bed-mounted passenger seats that each had grips for the deluded folks who rode back there. The grips are still available for about $10.00 each at Sabaru dealerships. I have flown with them in an RV4 and they are very comfortable. The switch is from Radio Shack. I fabricated a plate from 0.25" stock that is glued with Proseal to the top of the grip. The grip is too thick to mount the switch directly.
The grip ID is 7/8" which is perfect for the passenger stick, but too small for the 1" pilot stick. I mounted the pilot grip on a piece of 7/8" aluminum tube which will nest in the pilot control column and be secured with a couple of small bolts. Obviously the control column will have to be shortened to compensate for the grip.
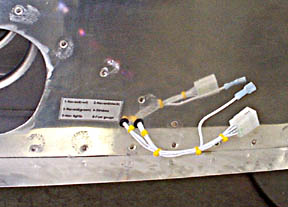
2/22/99; 2.0 hrs; installed connectors for wing wiring harnesses. The connectors are Molex from Radio Shack. Note the computer generated label with pinouts for the wiring in case my memory fails sometime in the future...
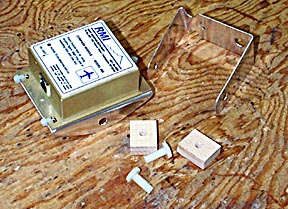
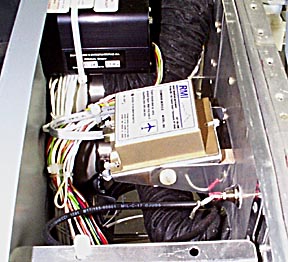
3/1/99; 5.5 hrs; completed wiring RMI uMonitor; fabricated and installed mount for RMI compass module.
Several issues have to be addressed when designing the mount for the RMI compass module. The module has to be mounted exactly parallel with the earth when in level flight attitude, and provision has to made for adjustments in all three axis. Also, ferrous materials can't be used in the mount.
My solution (as yet untried) was to fabricate a gymbal type mount from scrap 0.025" aluminum. Three 1/4"x20 nylon bolts with hardwood nuts were snatched from the R/C plane junkbox. The two plates were built as shown, and the module was attached to its mount with nylon cable ties.
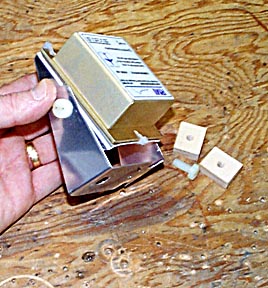
Here is the semi-assembled mount. The two bolts on the side of the plate allow adjustment in pitch, and the U-bracket attaches to the subpanel with an aluminum rivet and another nylon bolt. The hole for the bolt is slotted so adjustment is possible in the roll axis. The module is mounted aligned with the centerline of the plane, but yaw adjustment is possible by messing with the cable ties.
Here is the module mounted between the panel and subpanel. At this point I don't know if there is going to be enough magnetic stuff going on in this area to mess up the module....time will tell. The mount worked out very nicely and is quite rigid; The calibration light and switch are easily accessed as well.
3/4/99; 3.25 hrs; fabricated harness for transponder and uEncoder; installed harness in panel. 3/5/99; 3.5 hrs; completed wiring!! (Unless I decide to add something...)
I installed an auxillary power outlet for odds and ends (stereo, TV, microwave oven, etc...). Also visible at bottom of photo is the Alternate Power switch for the Essential Bus. Note as well the PTT switch for the passenger; This eliminates the need to hassle with a switch lead when the passenger stick is removed.
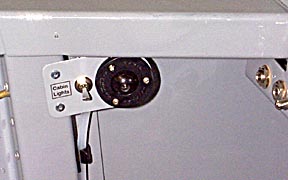
I installed a couple of eyeball cabin lights on brackets that are riveted to the spar bulkhead. I will add a dimmer later if deemed necessary.
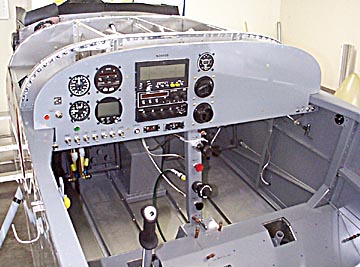
Ahhhhh, a beautiful sight! Panel and wiring is complete and cabin is ready for installation of interior. By the way, I connected the battery, took a deep breath, flipped the master switch.........and everything worked! No smoke escaped from the wiring harness.
A handheld GPS will be mounted on the panel. The wiring is in place for GPS power and connections to the Navaid autopilot. 3/12/99; 2.75 hrs; installation of Gall's flasher in landing light circuit.
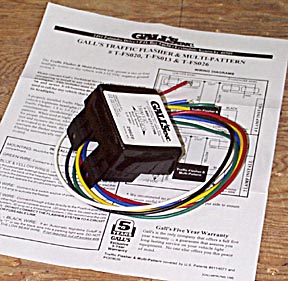
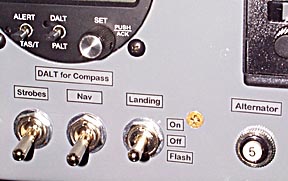
This is the Galls' model FS020 Traffic Flasher. This unit is designed to flash the highbeams of emergency vehicles in an alternating pattern. Why not insert it into the landing light circuit to increase awareness of our presence in the traffic pattern? A double throw switch is needed to cycle the lights from the flashing or standard mode. I also installed a 30 amp headlight relay (Radio Shack #275-226) in the circuit because I was concerned about the switch's capacity especially if I decide to go with 100 watt lamps instead of the standard 55 watters. The flasher isn't too hard to install; The biggest wrinkle I faced was encorporating the relay into the circuit. After one false start, the flasher operated as designed. Here is the crude schematic I scribbled as I was figuring out how to include the relay in the flasher circuit. This circuit may not be the ultimate solution since it only includes the relay when the landing light switch is in the "On" position. My thinking was that having both bulbs burning simultaneously would be when the switch would be under the heaviest load. Update 12/14/01: I decided not to upgrade to 100W bulbs because the 35A alternator would be overloaded with everything turn on. The 55W lights throw an adequate amount of light for operations into lighted airports.
The landing light switch has a center "Off" position, Flip it up for "On", and down for "Flash". Cool! A better idea would be to have a bottom "Off" position, then flip up for "On", and another upward flip for "Flash". This will be an easy upgrade once I find the proper switch. Notice once again the computer generated labels printed on clear Avery laser printer mailing labels.
Check out the installation of the interior.
Please submit all questions and comments to sbuc@hiwaay.net
|
Getting Ready to Build Building the Tail Building the Wings
|
|

