The RV Journal N399SB Gets a Fresh Engine |
 |
|||
(6/1/00)
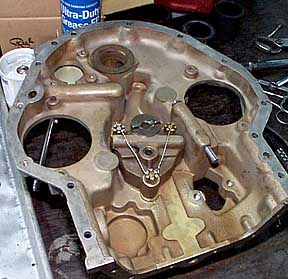
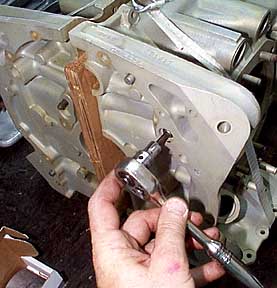
All the engine parts, even those fresh from rebuild, get a thorough washing in solvent. The accessory case is the first stop on the rebuilding trail. Shown is the oil pump and fuel pump pushrod.
The E2D originally had only an oil screen, so I decided to upgrade to a spin-on filter from Niagara Airparts.
There are five plugs that must be installed in the case or you will have a very bad day when the engine is first cranked (as in no oil pressure).
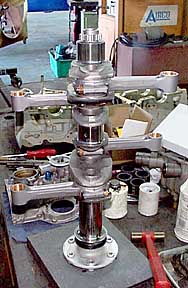
Here is the crankshaft/rods assembly ready to be placed into the crankcase. The rods are numbered for proper balance and orientation. Notice the front crank seal just behind the prop flange. Believe it or not, it is installed by stretching it over the flange! This is an operation so gruesome that I couldn't bear to photograph it. The flange was wrapped with duct tape, slathered with some very slippery lubricant, and the seal was forced over the the flange with a couple of screwdrivers and lots of grunting. Amazingly, it resumed its normal shape and size shortly after the torture.
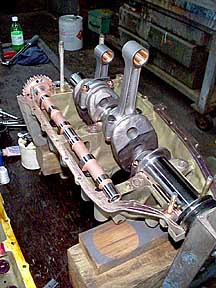
The simplicity of these engines is remarkable. The seal between case halves is enhanced with string. Yes, string, kinda like dental floss. After the mating surfaces are treated to some sealant, two strings are placed on the surfaces. The red stuff is grease which is applied to all bearing surfaces which will prevent wear when the engine is started for the first time. Notice the cam runs directly in the case without any bearings.
The case halves are about to be joined. The lifters have been dropped into the case along with the cam, the strings are in place, a few o-rings are installed, and the through studs are positioned.
The next installment will have us finishing up the bottom end of our new engine.
(6/2/00)
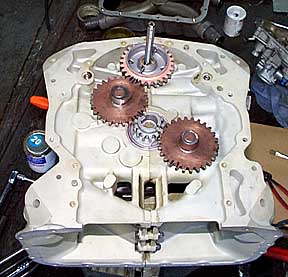
This photo details the crank, cam, and mag gears at the rear of the engine. Each gear has index marks that makes it easy to get the cam and crank timed properly. The shaft protruding from the cam gear is the tach drive. The accessory case can now be put in place. Area at the bottom of the case is where the oil sump will attach.
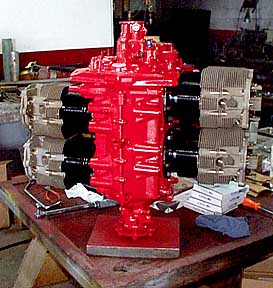
What!? Why not paint it red? The Millennium jugs come with black barrels and anodized heads which I think goes quite nicely with the PlastiKote Universal Red engine enamel. One more session in the engine shop and we ought to be ready to return the motor to the hangar.
(6/8/00)
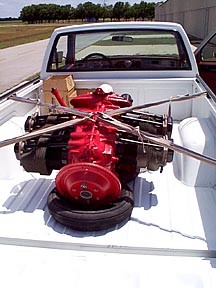
The engine arrives back at the hangar! RV drivers Robin Hunt and Bob Butler along with my son Michael all pitched in to get the motor back where it belonged on the nose of 399SB.
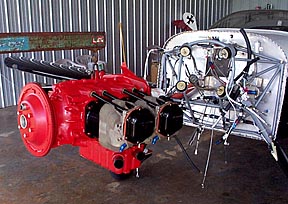
The only hiccup we ran into was an interference of the new oil filter with one of the oil cooler lines. I installed a new 45-degree fitting on the offending line and the problem was resolved.
All buttoned up and ready to fly! Many thanks go to Richard Trulson of Ardmore Aviation for his oversight and direction of the rebuild. Richard's engine prowess has been demonstrated by the reliability of many local powerplants.
This engine is a "certificated" engine in that all AD's have been complied with, all parts are new or yellow tagged, and all mandatory replacement parts have been....replaced. Richard's signature in the engine log completed the rebuild and 399SB has a new engine. (Richard was struck down by a fatal heart attack in June, 2005. He will be greatly missed by all who were fortunate to be exposed to his vast aviation knowledge and down-home humor.) Note; for another account of how an RVer bought and rebuilt an engine for his project, read Jim Harchanko's article.
Back to Fresh Engine, page two Return to The RV Journal front page
Please submit all questions and comments to sbuc@hiwaay.net
|
Getting Ready to Build Building the Tail Building the Wings The Finish Kit
|
|