|
 |
|||
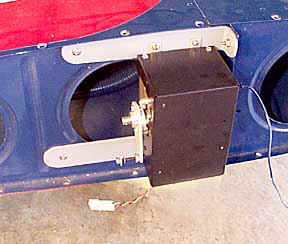
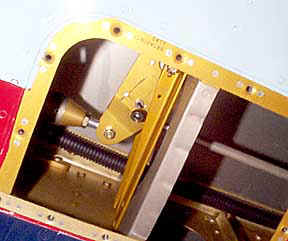
The installation of the Navaid AutoPilot in N399SB probably has produced more inquiries than any other aspect of the project. Many builders agonize over how to mount the servo. The problem as I perceive it is that many builders are overly concerned with placing the servo, and attempt to "over-engineer" the mount. The servo only has to attach to the aileron control circuit at one point, and several possibilities exist. Some servos have been mounted below the passenger seat bottom where a short pushrod can attach to the control column. The space is a little tight, and care must be taken to avoid an installation that will introduce pitch inputs to the control column. The seat installation is a viable option, but does require some surgery to the seat ribs. I mounted the servo in the inspection bay of the right wing so the short pushrod could be attached to the aileron bellcrank. This eliminated the pitch input problem, and the mounts were fairly easy to fabricate. The servo has to be removed from the bay through the inspection hole which is a tight fit but possible without too much effort. However.......what is the best installation option for an RV that is already flying? RV-6A driver Bob Butler (N413BB) wanted to install a Navaid after seeing the unit in my plane (actually he got tired of hearing me crow about how "George" was flying my plane on long cross country legs) and we contemplated the easiest method of installing the servo in his completed aircraft. The seat bottom option just sounded like a lot of work, but easier than trying to install mounting brackets in the wing inspection bay. However, Bob was concerned about the pitch inputs even though I assured him we could avoid that issue with a careful installation. I think the thought of hacking up the seat bottom ribs is what really got to him, and I have to admit the idea of working down in the confines of the cockpit was not a very attractive idea. We decided to mount the servo on a wing tip rib and run a pushrod to the aileron bellcrank. This provided the advantages of the inspection bay installation without the near impossible task of fabricating mounts inside the wing. Fortunately Bob had left part of the wing spar protruding past the outside rib, and he and RV-9 builder Randall Eckstein quickly fabricated some simple brackets to secure the servo.
As you can see, all that is required is a couple of straps with an angle bent on one end. My first impulse was to mount the servo directly to the spar web just inside the rib, but that would not allow the pushrod to clear the rib lightening holes. Bob had to move the servo arm 180 degrees and reverse the motor and pot wires in the servo. This procedure is outlined in the Navaid manual.
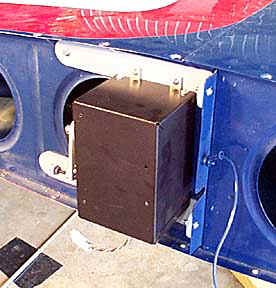
"But what about creating an unbalanced wing by hanging the servo out on the wingtip?" you ask. Good question, but since Bob only has one landing light, and it is installed on the opposite wing, imbalance shouldn't be a problem. I suppose you could mount some ballast on the opposite wingtip if you were really concerned about this, but I think it is probably a moot point. There is probably a much greater imbalance when we run the fuel tanks a few gallons out of trim.
This installation is by far the quickest and easiest servo mount I have seen. The only other task required is to run some wires through a wing conduit (PVC pipe), remove the turn coordinator and install the Navaid head in its place, hook everything up, and start playing. The servo can be quickly accessed for adjustment and/or service by removing the wingtip.
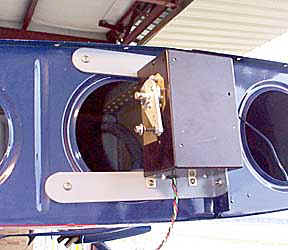
Here is the pushrod (57") Bob and Randall fabricated. The only concern we have with the installation is whether or not the pushrod is stiff enough. If not, Bob can either fabricate a Teflon support a couple of ribs into the wing, or make a new pushrod from larger diameter tubing. I suspect this pushrod will work fine, but we will keep you informed. Update 4/29/00: Even though no in-flight problems were observed with the skinny pushrod, Bob replaced the skinny pushrod with a 3/4" diameter unit. Here is Bob's drawing for simple machined adapters to transition the supplied tubing and bearings to large diameter tubing.
The pushrod attaches to the aileron bellcrank via the supplied little bitty allen head bolt and rod end bearing. The only alteration to the bellcrank is drilling one hole for the little bolt.
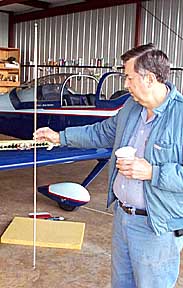
Update 3/15/00: The installation works like a charm! Today, Bob and I flew our RV's out for $90 ham sandwiches at the on-airport deli at Rome, GA (RMG), and used the flight as an excuse to play with the Navaids in our planes. Bob has reported........... that there is nothing but good to report! The installation works just as well as the wing inspection bay installation in my plane, and the servo is much more accessible and doesn't require removal for tweaking. I feel this is a superb installation option, not only for a flying aircraft, but for a plane still in the shop. You can email me or Bob if you need additional info. Update 4/06: After six years of service, the wingtip servo installation in Bob's plane continues to work flawlessly. Now, if I can just convince him to trade in the old Navaid for a slick new Trio EZ-Pilot (uses the Navaid servo).........
Back to The RV Journal front page
Please submit all questions and comments to sbuc@hiwaay.net
|
Getting Ready to Build Building the Tail Building the Wings Building the Fuselage
|
|