| Navigating through the configuration software for
the Micro-Trak trackers is not particularly difficult but does involve dealing with some
terminology that most pilots have not previously encountered. Byonics provides a good
config document in the download of the configuration software, but the purpose of this
article is to streamline the process and fill in areas that pertain particularly to
airborne trackers. You will need a cable for connecting your computer to the tracker for
the configuration process. The simplest and most reliable method uses a computer with a
serial port. A laptop that only has USB can also be used but be advised that problems
sometimes arise with low-cost commercial USB-serial converter cables. It may be worth the
trouble to find a desktop or older machine that has a serial port. This also allows you to
construct a very simple cable for configuring the tracker.
The homemade cable only consists of two female DB-9's (you don't have to install the
shields) and some common wire (shielding not necessary). Wire up the cable using this
format:
computer pin 5 ------------------- tracker pin 5
computer pin 2 ------------------- tracker pin 3
computer pin 3 ------------------- tracker pin 2
Note that 2 and 3 are crossed. This is intentional and absolutely necessary for the cable
to function. This serves as the "null modem" mentioned in the Byonics manual. Do
not attach a null modem to this cable or you will "un-null" it! By the way,
this cable is bi-directional, it'll work regardless of which end you attach to the
devices.
If you have a commercially available cable, you can add gender changers and a null modem
in order for it to allow the computer and tracker to talk to each other. But the homemade
cable only requires a few minutes to make, costs nearly nothing, and works like a charm.
Here is a screen shot of the configuration page in the Byonics software:

This screenshot is basically what I use with my tracker and this config has proved to work
well for many users of Micro-Traks. Let's work our way through a few areas where questions
often arise with new users. Start out by being sure the "Primary" tab is
selected.
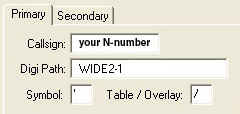
You have some choices for the call sign to use to ID your tracker. The traditional method
used by most ground-bound trackers is to insert the FCC call sign into the "call
sign" box. This works fine for our trackers as well. However, many of us wish to have
our N-number appear on the tracking maps since those following our flights will be more
familiar with the tail number of our plane than our Ham call sign. Using the N-number is
legal as long as we ID the tracker according to FCC regulations and we will address that
matter shortly.
The Digi Path determines how your tracker packets will be handled by the APRS network of
repeaters. The recommended norm for ground trackers is "WIDE1-1, WIDE2-1" which
triggers not only large repeaters but also small, fill-in repeaters that assist in getting
your beacons to an iGate. However, since an airborne tracker can "see" to the
horizon, and we only need to hit the big repeaters, eliminating WIDE1-1 will prevent
unneeded bounces from the small fill-in stations. Either protocol will work, but using
only WIDE2-1 is recommended for our use unless conditions in your local area dictate the
addition of WIDE1-1. If WIDE1-1 is used, be sure it is placed before WIDE2-1
to prevent a wide-ranging cascade of repeater transmissions from occurring.
The symbol fields allow you ensure the generic little airplane symbol is displayed with
the track of your flight on the internet maps. Use an apostrophe and a forward slash for
the little airplane.
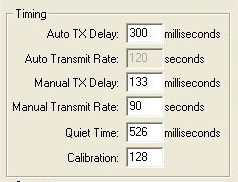
The Timing fields can be left with the default settings and you will most likely never
need to make any changes unless you get really creative with the config of your tracker.
This area is primarily for those who use the sister product, Tiny-Trak, with a handheld
transciever.
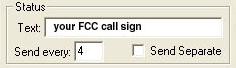
The Status area is important because this is where you ID your tracker per FCC regulations
if the N-number was inserted into the Call Sign field. The text field will accommodate
whatever text you wish to use and some Hams get creative by inserting stuff like
"Howdy Ya'll, Billie Bob's tracker is back on the road agin!" but keep in mind
the text field adds to the length of the packet and increases the possibility of the
packet getting dropped if the frequency is crowded. At the very least, your FCC call sign
needs to be in the text field, and you might want to add the aircraft type.
FCC regs require our tracker to be ID'ed at least every ten minutes (but you knew that
from cramming for the Tech exam...). Consequently, the status text doesn't have to be
transmitted with every packet (keep those packets short!) so if we add a number such as
"4" to the "send every" box we will satisfy the ID requirements if we
are using an interval of sixty seconds or so for our beacons.
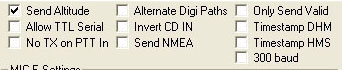
This area only needs minimal attention. The only check you will definitely want is
"send altitude" so the altitude of your plane will appear in the data on the
internet maps. Some airborne tracker users also check "only send valid". This
means the tracker won't transmit unless it is receiving good data from the GPS receiver
(green light is glowing steadily on the tracker). If you want the tracker to transmit for
set-up or diagnostic purposes without a GPS connected, this box should not be checked. Use
your own judgment on this one. In my case the GPS in the plane is generally locked on
prior to tracker activation so this is a moot point, your installation may be different.
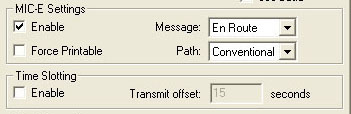
MIC-E is a compression protocol that works in our favor so there isn't much reason for not
using it. Use the default setting for the other boxes. Only exception might be the
"message" box if you are setting up secondary config for an emergency beacon but
that is a subject that will be dealt with later.
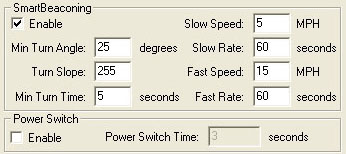
SmartBeaconing is a really cool feature of our trackers. The Byonics doc is pretty
good in this area and should answer most of your questions. By all means enable
SmartBeaconing if you want the highest quality track that shows the aircraft as it
maneuvers. The first column of boxes that deal with angle, slope, etc can be left with
default settings. The speed and rate settings shown in this example will work fine and get
you up and running but you may want to customize them as you get more familiar with your
tracker.
The remaining area at the bottom of the page is pretty much self-explanatory and covered
in the manual.
There you have it! This should get a tracker to the point where it is functional in your
aircraft and performing at a high level. We didn't discuss the secondary tab but it allows
you to have a second configuration that can be used if you want the tracker to transmit a
different packet protocol. This might be used if you want to transmit a unique emergency
packet or maybe you want to use your tracker on the ground and a different configuration
would work better for ground ops. A switch is required to activate the secondary config so
you can ignore the secondary tab if you don't intend to do something special with the
tracker.
Return to The RV Journal front page
Please submit all questions and comments to sbuc@hiwaay.net
|
|
Table of Contents
RV6 Home
Who is Sam?
The Hangar
Getting Ready to Build
Odd 'n Ends
Building the Tail
Horz. Stab Log
Vert. Stab Log
Rudder Log
Elevator Log
Uh-Ohs
Building the Wings
Wing Spars
Wing Assembly
Flaps
Ailerons
Fuel Tanks
Building the Fuselage
The Finish Kit
Links
Flight of Rediscovery
The Beat Goes On
The RV Journal
Front Page
Talk
to Sam

|
|
|
