RV Journal Product Review
Panel Planner Software v2.52
![]()
What is it?: Instrument panel design
software (Home version 2.52 evaluated)
Where do you get it? Panel Planner
Home Page
Interactive Solutions, Inc.
8659 Atwater Ave.
Boise, ID 83714
208-323-8724
208-939-8901, fax
What does it cost?: $99.00 for Home version, $199.00 for Pro version
Recommended system requirements: Pentium, 16MB ram, CD-ROM, 50MB hard
drive space, 800x600 w/16K color graphics, Windows 3.1 or later.
Manual included: 25 pages
Cheers: Actually makes designing a panel, well, fun! Extensive equipment
database can be user updated via internet; Supported by comprehensive web site; Can print
color mockup of panel with drilling template; Can use scanned print of owner's panel;
Develops equipment list with electrical load data, weight, and (gulp) price.
Jeers: Installation is a little clunky (has been addressed in v2.6); Interface could be a little more streamlined (see below); Encourages excessive computer usage which could be spent actually building...
Perhaps the most highly individualized portions of our RV projects are the paint scheme and the instrument panel. While Panel Planner can't help you with the paint scheme, it certainly can expedite the design and fabrication phases of the the panel installation. The old way of laying out a panel consisted of two methods depending on the desired sophistication:
A) Cut out full-scale paper patterns of the instruments and avionics and lay them on a
dummy panel, or
B) Start cutting holes in the panel and hope you don't run out of panel before the
cardboard box holding the instruments is empty.
That was then, this is now. Since you obviously have a computer, the means for designing a panel without scissors and guesswork is readily available. You can forget about having to know CAD, or CAM, or any other engineering stuff to join the age of computer-aided design. Panel Planner software is easy to use, and most important, provides a great way to "test fly" numerous panels without ever touching a hole punch. The almost magical way your new panel takes shape on your monitor is one of the coolest events I have experienced via aviation software.
I received the Home version 2.0 with a v2.52 update disk. The CD was used for the installation of v2.0, then the attached instructions were followed to update to v2.52 with the disk. Even though the program appeared to install properly, when I first attempted to drop an instrument onto the RV6 panel, I received an error message about "equipment data is nested too deeply in........" or something like that. I deleted the installed program, reinstalled, and this time the software functioned properly. Turns out this is a result of the software not being able to find the CD with the equipment data. I went ahead and copied the data files to the hard drive so the CD doesn't have to be loaded for the program to function. When I mentioned these quirks to Gordon Pratt, the talented creator of Panel Planner, he assured me that the CD installation of v2.6 is bug free.
As part of this review, I asked a fellow RV builder to install the software and give me
his impressions. Both of us, while not particularly geeky, use computers daily, so we know
our way around 'puters. I found it interesting that he had the same installation glitches
as I, requiring two attempts to get the program up and running properly. We noticed a
couple of other instances where execution could be more conventional. To reload a panel
that you have previously designed, you must click on "Panels", scroll down
through a long list of aircraft (Vans being near the bottom, naturally), click on Vans,
then click on your panel. Whew! It would be MUCH easier if the saved panel popped up in
the first dialog box that opens instead of having to wade through so many clicks. Also,
when you get ready to quit the program, the little "X" in the upper right corner
of the screen doesn't work! You must open "File", then click "Quit".
Curious....
(Editor's note: I mentioned these glitches as well to Gordon and he acknowledged the
"X" glitch. He is working on it along with the continual upgrades to the
program. Also, he suggested that I simply delete the aircraft manufacturer's panels that I
don't need. This is not a total loss since I have the CD and can reinstall any of the
panels in the future if needed. So I blew away all but the Vans directory: Now I can
quickly open my saved panels.)
But.......once this puppy was running, we started having big-time fun! Also using the software (not my copy, Gordon!) is my J3 partner and RV8 builder. He called me one night to tell me about his really cool panel software. His main problem was the indecision the software was creating due to the ability to design multiple versions of his RV8 panel. He thought he knew what he wanted, but after playing for an evening with the program, he came up with half a dozen neat panels: Consequently, he doesn't know what he wants now!
Included are scores of panels for many, many different aircraft, certificated and homebuilt. The RV series is represented by several panels, and you can import a scanned photo of your particular panel if needed. New versions or custom panels can be downloaded from the Panel Planner web site. I used one of the included standard RV6 panels for my design efforts. There is no need for me to write an operational manual in this review, but you can look over my shoulder as I work on the RV6 panel for some of the features of this software.
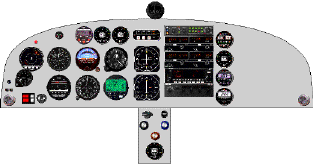
Here is one version of a panel I concocted for the RV6. Note the inclusion of both RMI units and the Navaid autopilot.
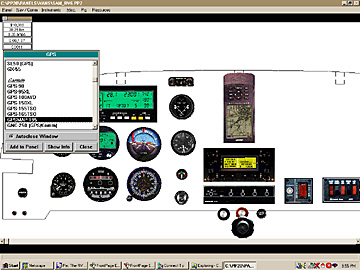
Once the panel is displayed, drop-down menus allow you to select which type of instrument or control you wish to install. Let's install an airspeed indicator. Click on instruments, then flight instruments, then airspeed indicators, and a box with a list of many specific indicators appears. By specific, I mean individual manufacturers with the referenced part numbers!
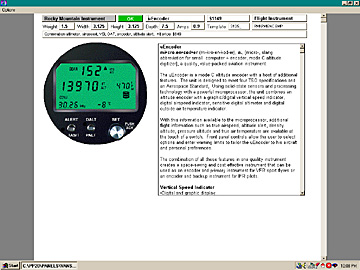
Select one of the indicators, then click "Show Info", and another page opens with manufacturer info, price, dimensions, a photograph, and a brief description. This is like having a huge buyer's guide at your fingertips! Once you have decided on a particular indicator (ever seen a builder running from one Oshkosh booth to another? Ain't a pretty sight...) click on "Add to Panel" and the indicator drops onto the panel. Now you can drag the indicator to the desired location on the panel. The software does have a little glitch in that the panel doesn't scroll automatically if you move an instrument to the margins of the window. You have to drop the instrument, scroll the window, then pick up the instrument again. A minor point, but hopefully one that no doubt will be addressed in future versions.
You repeat this operation for each item you wish to add to your panel. Don't like how the panel is looking? Just drag stuff around 'til it looks better, or ditch the instruments completely and start over! Since all the instruments are to scale, you can tell if the equipment is going to fit on your panel. By the way, I see no reason why you couldn't email your panel file to a friend who has the software so he can load your panel for critiquing. As you design your work of art, a little window in the upper corner of the screen keeps a running total of the electrical draw, weight, and cost of the selected equipment. Fortunately, you can quickly nuke this window in case the spouse walks by and you ABSOLUTELY MUST NOT allow anyone to see how many years your new panel is going to defer retirement.
Fortunately the program is pretty intuitive to use. If you click on the
"Help" menu, you will be treated to a rather meager list of options. You are
instructed to consult the manual, the help file on disk, or the automated telephone
support. I suggest you just try clicking on stuff till you get the program to do what you
want instead of wasting time with the help menu unless you have a catastrophic problem
that will require a call for help. The included manual is fairly comprehensive, though
kinda geeky in places, and I found answers to all the questions I had about printing
issues. The Panel Planner web site provides a high level of support and should be
bookmarked by all users.
(Another editor's note: Gordon informed me that the text of the manual will appear in the
help menu of the next version. Don't worry about this wart, however; You probably won't
need the manual.)
Speaking of printing, wait until you see the drilling template rolling out of your printer. Man, this is just too easy! The software allows you to assign coordinates for each item, and/or you could just make a full size template (requires tiling sheets, a little tedious but worth the effort) and simply drop it on top of your panel. The manual tells how to fine tune the size of the prints if necessary so everything will be properly scaled. My template printed properly without any tweaking. This is a very impressive component of this program!
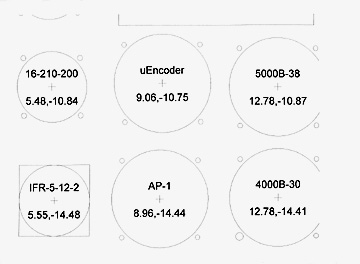
This scan of one of the tiled sheets may be hard to read, but notice the full-size templates and coordinates for the center of each instrument.
Another item I enjoyed was under the "Resources" menu. A three-part article on panel ergonomics is included and provides much food for thought. Accompanying this article is a section containing relevant FARs for equipment requirements. An area I have not yet delved deeply into is the precise layout positioning possible with the software.I really am impressed with the extremely wide range of cockpit controls and instruments accessed by the software.
If you really want to go whole hog, order the Pro version for $199.00. Additional features include the ability to print top and side views of the panel installation, exportation of files to CAD programs, and the option of installing equipment in "clusters". This is heavyweight stuff, folks!
Hopefully this admittedly cursory overview will be sufficient to give you a sense of the capabilities of Panel Planner. This is a very cool program! The glitches we noticed did not amount to more than minor aggravations, and certainly did not detract from the tremendous utility of the software. Gordon Pratt seems to be intent on future development of his baby, and no doubt upcoming versions will be even more impressive. (I have received a highly confidential memo from a mole deep within the corporate structure of InteracSol, the parent company of Panel Planner, that there are intriguing things in the works!) I must admit that when I first saw the program advertised on the web site, I was skeptical as to whether I would shell out a hundred bucks for something to lay out my panel. At this point, you could not buy this software back from me! The aggravation it will save once I commit saws and punches to panel metal is immense. Panel Planner has transformed a dreaded task into a fun exercise.
I just wish it could find an engine for me..........
Highly Recommended!
Sam Buchanan

Click Here for the Latest Info on Panel
Planner Software