The RV Journal Installing Team Rocket Gear Fairings
|
 |
|||
8/30/00 After 175 hours of flight in 399SB, I decided it was time for the metal gear intersection fairings and old-style wheel pants to be replaced. The original setup has served me well, but it was my intent from the beginning to eventually replace the fairings and pants with the latest pressure recovery pants from Van's. The new pants, which are now standard in all finish kits, are considerably larger than the old skinny pants, but due to some aerodynamic voodoo, are a lot more efficient. I knew the old set-up was aero dirty since I had left a lot of tire hanging out of the pants (I thought I might be based on a grass strip) and the lower fairings left the brake caliper hanging in the breeze as well. Hopefully we can clean things up and go faster. And we all like to go fast!
The reason for the metal intersection fairings was my extreme disgust with fabricating components from fiberglass. Fortunately for glass-phobes such as myself, Team Rocket is now offering pre-built (!!) gear and intersection fairings from high quality epoxy. I had heard that the fit was very good, and since I was ready to squeeze a few more mph from the RV-6, a call was made to Mark at Team Rocket and the go-fast goodies were on the way.
The Rocket fairings are designed to fit either their wheelpants or the pressure recovery pants from Van's. Since Van's units were a little less coin, you know which I chose. The wheel pants come complete with mounting brackets and hardware, and in a short time the wheels were pulled, the old brackets removed, and the new brackets were in place.
I followed the instructions supplied from Van's and didn't have any difficulties with the wheel pant installation. A cut-off wheel in the Dremel tool cuts fiberglass like a hot knife in butter but the dust is irritating. All the plate nuts and goodies required were in the Van's kit. The instructions call for one inch clearance above the tire, but I reduced it to 3/4".
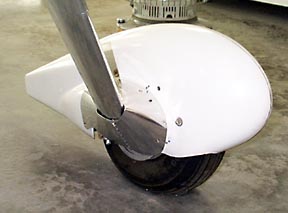
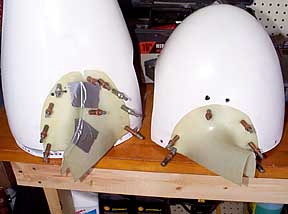
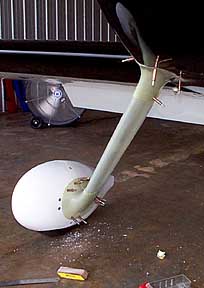
Here is the wheel pant installation with the lower Rocket fairing. The fairing is intended to be attached as shown with screws, but I decided to glass the fairing to the wheel pant and split the fairing on the same plane as the pants. This involved more work (quite a bit more as you will see shortly...) but yields a really clean installation with less stuff to disconnect when the front half of the pant needs to be removed for service.
The rear of the lower fairings came already slit to facilitate installation as a single unit. Since I changed the fairings into two-piece units, the slit had to be glassed (where the tape is located). In retrospect, I would seriously consider leaving the lower fairings as supplied. That would eliminate glassing the things to the pants.
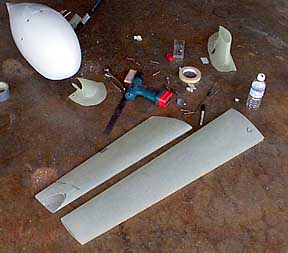
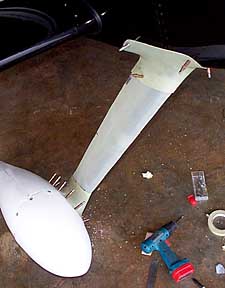
The gear fairings from Rocket are larger than the units from Van's, and considerably larger than needed on the RV-6. The fairing on the right is as supplied, and the one on the left is after I had trimmed it to fit the RV-6. Matter of fact, I later trimmed off the lower end to eliminate the notch. You must use the Team Rocket gear fairings if you use their intersection fairings. The quality of the glass is first rate.
The gear fairings need a lot of sizing, both in length and chord. Block sanding will get everything finished up after rough sizing with the Dremel.
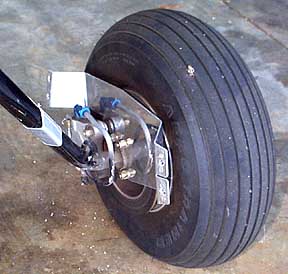
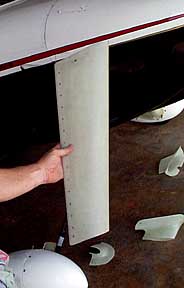
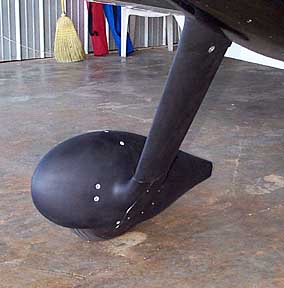
Here is the right leg ready for installation. Rocket recommends gluing the leg in place, but I decided to stay with Van's hinge method since I wanted to paint the fairings off the plane. The hinge also allows easy access to the gear legs if necessary.
Here we are, all fitted up and nowhere to go. The Rocket units fit remarkably well with little tweaking required. Three plate nuts hold the upper fairings in place, and the outside aft screw is tapped into a fuse longeron. Impressive!
I had to cut a relief in the bottom of the upper fairing for the fuel tank vents. After pondering how to attach the gear fairings to the plane, I decided to use a couple of screws and plate nuts at the bottom of the upper fairing. I leave these screws a little loose so the gear legs can move around without breaking the fairings. There is no attachment of the gear fairings to the lower fairings.
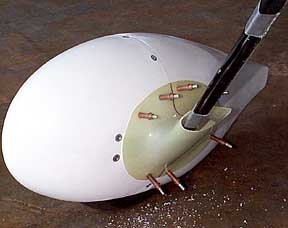
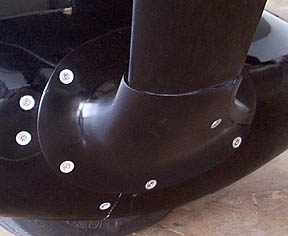
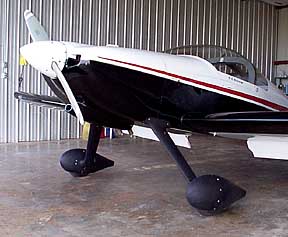
And this......is the finished product in black primer. Real Expensive Glossy Paint will be applied later after I determine that nothing breaks or falls off........ Uh, oh......... During the first test flight, something did fall off! The rear half of the left lower fairing departed the plane somewhere over Limestone County. The slipstream got under the split edge of the fairing, and the glassed over split at the rear of the fairing opened and.....goodbye. The photo above shows the pop rivets I installed in the right rear fairing to prevent a similar loss. The rivets will be filled when the Real Expensive Glossy Paint is applied. I took a piece of the cut-off gear fairing, molded it with a heat gun, and fashioned a replacement left rear fairing. I also fabricated U-shaped brackets inside the lower fairings that will prevent the exposed edges from being pulled open by the wind.
Update, 4/11/02; After an idiot at an airshow stood(!) on one the wheelpants, the lower fairing for that pant no longer fitted properly in spite of my efforts to repair the damaged bracket. The gaps in the lower fairings were also opening a little, so I decided to replace the lower fairings and mount them as they are delivered from Team.
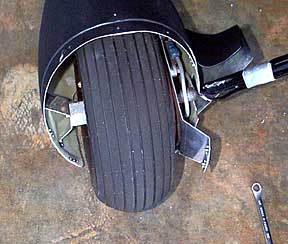
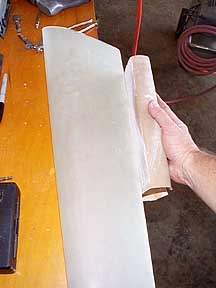
The fairings are delivered in one piece and designed to be cut near the trailing edge so they can be installed over the leg fairings. There is a flange molded into the fairing that can carry a platenut for a screw that will hold the fairing together once it is attached to the wheel pant. There was supposedly a line scribed on the fairing where the cut was intended, but my fairings were delivered without the line. (My original set of fairings were delivered with the cut already done, but this set was supplied uncut.) I used a Dremel with a cut-off wheel to carefully make the cut about 1/4" in front of the trailing edge; a piece of scrap aluminum sheet was slipped in between the flange and the body of the fairing so the flange would not be damaged during the cutting process. There is plastic release material between the flange and the side of the fairing. If you look carefully at the photo, you can see the cut line running near the trailing edge of the fairing. You need to keep the cut as close to the trailing edge as possible so you can slip the fairing over the gear fairing. Platenuts were installed in the wheel pants to secure the fairings to the pants; there is no attachment of the gear fairings to the lower fairings so the gear can flex without stressing the fairings. Which method is better? The former method produces a very slick installation with a minimum of hardware but requires you to get involved in fiberglass work. The latter method is quicker and allows you to replace just the lower fairing if necessary. You makes your choice.......... :-)
Well, was all the work worth it? You decide. At 5500' density altitude and 2500 rpm, TAS went from 173 mph to 181 mph. Granted, my old installation was draggy, but there is no doubt the pressure recovery pants are recovering pressure, or whatever it is they are supposed to do! The plane is also quicker to pick up speed when the nose is lowered, and I notice lower manifold pressure is required at all speeds. Yeah boy! A couple more little mods and we are going to have a pretty decent 160hp RV-6. A prop repitch will be forthcoming since the 77" pitch enables me to easily hit the 2600 rpm prop redline which at 4000' results in 188 mph TAS. With a 80" pitch, and a cool day, I think we will be able to get pretty close to the magic 200 mph mark. The Team Rocket fairings are a great value for the RV-6 builder. The Team has units for other models and details are on their web site. Unless a builder just loves to mess with fiberglass, I recommend he tell Van's to keep the standard gear fairings and plan on a set of Rocket covers. Epilogue: Repitching the Prop (9/7/00) The engine upgrade from 150hp to 160hp revealed a possibility for increasing the pitch of the prop. The new wheel pants and fairings made the repitch almost mandatory. I was able to hit the 2600rpm redline much too easily with quite a bit of throttle still sticking out of the panel. One reason I selected the metal Sensenich prop was due to the option of repitching at any time. A prop shop is located thirty-five minutes south of DCU at TCL (Tuscaloosa, AL), so an appointment was made to fly down with the assistance of RV-6A driver Bob Butler and leave 399SB overnight . The repitching process is a rather primitive affair. The prop blades get twisted, yes, twisted to the new pitch! If you have visions of a couple of large guys bouncing on a long pole as the blades are twisted, you are just about correct. It takes a large leap of faith to remove a perfectly good (and $$$$$!) prop and subject it to this kind of apparent torture. But, this is the way it was done. (Note: Ed Zercher at Sensenich has brought to my attention the hydraulic process they use at the factory to repitch props. It is basically the same idea, but doesn't look quite as, ah, low tech. I had considered returning the prop to Sensenich, but was just too impatient to tolerate the turnaround. Returning the prop to Sensenich certainly would be a good way to go if you don't trust the local shops.)
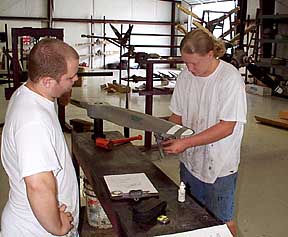
First step was to establish the present pitch. The prop as delivered was sold, and stamped, as a 77" pitch. When the techies checked, it measured 75". Now, I really didn't know if Sensenich messed up or the measurement fell victim to some sort of error, but at the very least I was left with having to re-evaluate the game plan. Van's recommends 80" on the 160hp RV-6 with pressure recovery pants, and that was what I had intended to follow. Now, with the possibility that I was actually five inches from that ideal, I was faced with a dilemma. Go with the additional three inches (and have either the correct pitch or be two inches under pitched) or jump five inches (and either have the correct pitch or two inches over-pitch). (Another note from Ed: There are templates that must be used with many props to get a completely accurate reading of the blade angles. I suspect the required templates failed to make an appearance in my case.......) What would you have done? I decided to add three inches of pitch because if we ended up slightly under-pitched, we would still have excellent climb performance with good cruise. Go past optimum by two inches, and we might end up with a doggy RV-6. (I probably ended up with an 80" pitch according to the notes from Ed.) .
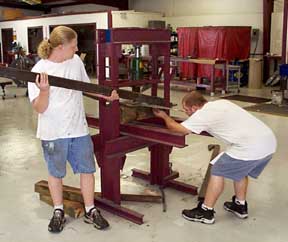
This was kinda hard to watch. The prop (my beautiful, $$$ prop) was clamped into a hydraulic press, and a most fearsome-looking bar with a large hook on it was placed over a prop blade. Several stations had been marked on the blades with the various target degrees of pitch. The largest tweak was to occur near the root, the rest of the blade would be fine-tuned as necessary.
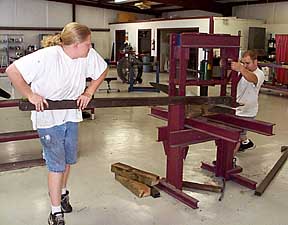
After watching this process for awhile, I had seen enough and decided to take up a couple of local RV builders on their offer for lunch. When I returned, the deed had been done, but not before the guys had to go get another beefy fella to help twist the heavy stock near the root of the blade! The RV props are a challenge due to the very high pitch already in the props. Since the bar mars the paint, props in this shop are repainted following repitching. If the prop had been in service for a considerable time, it would also have received a dye penetrate test to check for cracks. So, how does 399SB fly with the new prop? Very nicely, thank you. Three inches of pitch equated to almost a degree additional twist in the blades. I immediately noticed that the takeoff rpm dropped 80 rpm, down to 2250. The ride home was bumpy under low ceilings, so I wasn't able to get good numbers. However, I am still able to exceed 2600 rpm but not nearly as readily. In comparison to Bob's RV-6 with 79" Sensenich and 160hp, I am running close to the same rpm at 165 mph. I will have better numbers soon, but it looks like we hit it pretty close on a good compromise pitch. And selecting a fixed-pitch prop is definitely a compromise!
Update 11/10/00 I have now flown the new prop long enough to get a pretty good handle on the speed numbers. I use the RMI uEncoder to calculate TAS mph and here is what I am seeing with the pressure recovery pants and 80" prop. The speeds detailed are "real world", not picky, super-accurate, high-dollar test pilot numbers. Bottom line is.......I now have a 190 mph RV-6. I can barely exceed 2600 rpm at full throttle either down low or at 6500'. In either case, 2600 rpm indicates 190-192 mph TAS. This is remarkably close to what Vans claims in their specs for a 160 hp RV-6 with a wood prop that will allow full power at 2700 rpm. 399SB is now 12+ mph faster than it was with 150 hp, the standard pants, and a 77" prop. During cross-country trips, I often set the power at 2500-2525 rpm which reliably returns ~185 mph TAS. Fuel burn averages about 8.7 gal/hr at this speed. All in all, the fairings, pants, and re-pitch were very worth-while modifications!
Return to The RV Journal front page
Please submit all questions and comments to sbuc@hiwaay.net
|
Getting Ready to Build Building the Tail Building the Wings The Finish Kit
|
|