PicoDopp Completion Information
Introduction
The PicoDopp DF consists of 6 OEM PC boards that are assembled and tested, but they are not assembled into a finished DF instrument. Additional work by the user is required, involving some construction skills and tools. The user must also provide an FM receiver, an antenna platform, a display computer, and all the interconnecting cables. Most users also want to house the PC boards in enclosures, and provide disconnect plugs on the cables, to facilitate install / removal of the DF.
The PicoDopp is intended for amateurs and hobbyists, ( technical people ) and also for engineering folks with an application that requires a Doppler DF "sensor". Final assembly requires soldering skills, the ability to read and interpret schematic diagrams, and some metalworking "shop" skills to fabricate the antenna platform.
This document provides the user with enough information to accomplish this work. The reader is encouraged to read this document carefully, to obtain some idea what is required to accomplish the task. If the reader feels their skills are not adequate for this task, then the reader is discouraged from purchasing a PicoDopp. Alternatively, the reader is encouraged to enlist the help of a technical friend with enough skills to accomplish the task. ( please have them read this document before they commit to assist )
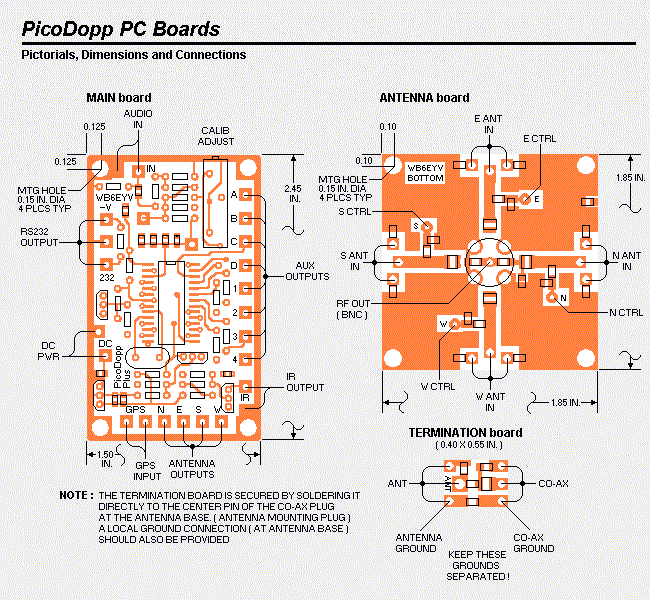
Board Details
The figure below shows the details about the PicoDopp PC boards. Four TERMINATION boards are provided, ( one for each antenna ) although only one is shown here.
Interconnect Diagram
The figure below shows the interconnections required for the basic PicoDopp DF. Additional connections for the ( optional ) local displays are provided in the website pages that describe those particular displays. Those displays ( if employed ) use the AUX outputs ( 8 wire pads ) provided on the PicoDopp MAIN board.

The Antenna Platform
The antenna platform consists of a horizontal metal plate ( = antenna ground plane ) and 4 vertical antenna elements. The metal plate is typically 2x2 or 3x3 feet, and re-enforced with struts to add strength and rigidity to the plate. ( left photo, an older design using a 4x4 foot sheet ) It can be secured to a vehicle roof with a cargo strap, and tennis balls can serve as cushions to prevent paint damage to the vehicle roof. ( right photo, tennis balls are pierced with a drill and anchored with tie wraps )
 |  |
The antenna elements are typically made from ( brass ) braizing rod obtained at a welding shop, usually 12 to 18 inches long each, but never greater than 1/4 wavelength. They are soldered ( at one end ) into RF connectors of some kind to allow easy install / removal from the platform. ( BNC, UHF or RCA phono plugs are all suitable ) The mating connectors for each antenna element are installed into holes drilled in the metal plate.
The holes for these mating connectors must be arranged into a square, with all sides of the square being of equal length, within 1 inch. The center of the square should correspond to the center of the plate, to ensure uniform RF sensitivity in all directions for the finished antenna. The size of the square should never exceed 1/4 wavelength on any side, or 50 percent of the size of the metal plate, whichever is smaller.
The 4 TERMINATION boards are designed to attach directly to the 4 mating connectors, by soldering them to the center pin of the connector. ( the terminal marked ANT on each TERMINATION board ) A local ground connection is also required at each TERMINATION board, for RF reasons. ( use either of the ground pads located directly next to the ANT terminal )
The ANTENNA board is also installed on the underside of the metal plate, near the center of the plate. Four standoffs ( of some kind ) are required for this. Do not allow the standoffs ( if metal ) to "short out" to the PCB track on the backside of the ANT board that runs near the standoff mounting holes... no damage will result, but the antenna will not perform well, if this track is shorted to ground.
The ANTENNA board is connected to each TERMINATION board with a short length of coaxial cable. The length of these 4 cables is not critical, but all must be of equal length, within 1 inch. The shield for these cables operates about 1 volt DC above vehicle ground, so do not allow them to make contact with vehicle ground, at either end of the cable. ( The DC voltage provides reverse bias for the PIN switching diode, located on each TERMINATION board )
The RF output of the ANTENNA board is provide with a BNC connector, which must be connected to the antenna input of the FM receiver, with a coaxial cable.
Platform Part List
As a convenience for PicoDopp users in the United States, the following parts list identifies the major items required for a small antenna platform. ( 2 x 2 feet ) All the materials can be ordered by phone ( in the U.S. ) with a credit card, and delivered by ordinary courier services, such as UPS. Additionla items ( coaxial cable, etc. ) will also be required, but the items identified here are usually the most difficult to identify and/or obtain.
DigiKey

   1      enclosure	HM860-ND		$   2.16	( for ANTENNA board )
          ( alternate )	HM867-ND			( substitute enclosure )
   4      enclosure	HM375-ND		$   6.40	( for TERMINATION boards )
          ( alternate )	HM378-ND			( substitute enclosure )
   4      BNC jam nut	A24525-ND	$ 12.12	( antenna connectors )
   4      BNC plug	ARFX1119-ND	$ 10.08 	( for antenna elements )
   1      DB9M ch mtg	109M-ND		$   1.75 	( disconnect plug, chassis mtg male )
          ( alternate )	209ME-ND		$   0.70
   2      DB9 boss	160-15F-ND	$   1.10 	( locking hardware for plug )
          ( alternate )	160-10FA-ND	$   0.74
   2      DB9 mscw	160-02M-ND	$   1.62 	( locking hardware for plug )
   1      DB9F cbl mtg	209F-ND		$   0.67 	( disconnect plug, cable mtg female )
          ( alternate )	209FE-ND		$   0.77

McMaster Carr

   1   alum sht  	88685K17		$ 15.91	( 2 x 2 feet x .032 aluminum )
   1   alum L strut 	88805K47		$ 10.57	( 1 x 1 inches x 8 feet, for struts )
   4   18 in. ant	7972A201		$   9.07	( 1 lb of brazing rod for antennas )
The FM Receiver
When installed, the antenna input of the FM receiver is connected via a coaxial cable to the BNC connector located on the PicoDopp ANTENNA board. The FM reciever speaker output is connected to the PicoDopp audio input.
The PicoDopp DF requires an FM receiver, which the user must provide. This receiver determines the operating frequency for the DF. ( DF radio channel ) The receiver must be an FM receiver, because Doppler shift is a form of frequency shift, so the receiver’s detector must be a "frequency shift detector" ( FM detector ) to recover the Doppler signal.
The intended operating range of the PicoDopp DF is 100 to 1000 MHz, but reasonable operation beyond these limits can be expected, with a suitable antenna platform. ( Details provided below )
No internal modifications to the FM receiver are required. The Doppler modulation ( caused by the antenna switching ) results in an audio "tone" or "whine" that is detected along with any "voice" audio in the received signal. The frequency of the Doppler tone is about 430 Hz, and it passes easily through the audio circuits of the FM receiver, just like any other audio tone.
The GPS RS232 Input Port
The GPS RS232 input accepts 4800 baud NMEA data, scans the data for the $GPRMC, $GPGGA and $GPVTG sentences, ( very common ) and relays these sentences ( if found ) through the PicoDopp RS232 output port, to the display computer. GPS Data is NOT fed to the IR port. To increase the amount of DF data provided, every 3rd GPS message is relayed, instead of each message. Furthermore, only the $GPRMC message is relayed, if found. Otherwise, the $GPGGA and $GPVTG messages are relayed, if found.
The GPS itself must generally be configured to transmit NMEA data, because a variety of data formats are available. ( NMEA is the most common format ) In some cases, it will be necessary to buy a special cable from the manufacturer, to get the data. The $GPRMC, $GPGGA and $GPVTG sentences are the most common NMEA sentences provided, but if you wish to confirm their presence in your GPS output, you can examine the data stream with HyperTerminal, which is provided ( free ) with every Windows operating system, in the PROGRAMS / ACCESSORIES menu.
If you do not wish to employ the GPS input, simply leave it disconnected...
The WinDopp DF Display Program
The (free) WinDopp DF display for the PicoDopp DF will be added to the website in July of 2004. It is modeled after the ( original ) MsDOS display program, described below. The WinDopp program has some additional features, particularly the ability to use the GPS data to provide heading information. This is a valuable feature, since the integration routines require accurate heading information to operate continuously. The only way to achieve this with the MsDOS program is (1) constantly update the heading data "manally", using the HDG UP and HDG DN keys, or (2) using a NorthUp compass, described elsewhere on this website.
Additional WinDopp features include user-defined colors that are saved/recalled on disk, selectable GPS or MANUAL heading inputs, and a feature to show or hide the display controls. More details about the WinDopp program are available on the webpage titled MORE WINDOPP INFO.
The MsDOS Display and RS232 Output Port
The ( free ) MsDOS display program is an alternative computer display for the PicoDopp DF, although all the available PicoDopp displays can be used in any combination. ( except the two ECONOMY displays cannot be used together ) The start-up page for the IBM display program enquires about the desired COM port and baud rate. The default values are COM2 and 1200 baud, but the PicoDopp uses 4800 baud. ( you must select the new baud rate ) The MsDOS program start up in a "simulation" mode. To select the RS232 input, ( and display real DF data ) the user must type "T" ( turns off the "test" mode ) and then "C". ( clears the display of old data )
If the DF data fails to display, ( shows "COM TIMEOUT" in top left area of the IBM screen ) There are some possible ( simple ) causes. For one thing, the PicoDopp DF does not generate any messages unless there is a Doppler audio tone present in the speaker output of the FM receiver, and the tone is loud enough ( at the DF input ) to produce a DF bearing with at least 5 degrees of accuracy.
Listen to the speaker audio, confirm that a signal is present on the channel and Doppler audio tone is present, and try turning up the volume a little. If a signal is present but no Doppler audio tone, check the antenna wiring.
For bench tests without an antenna, reciever and/or signal, an "artificial" Doppler audio tone can be easily obtained by disconnecting the FM receiver speaker output, and shorting the PicoDopp audio input to any of the 4 antenna control lines. ( N,E, S or W ) This will definitely trigger the PicoDopp input, and cause the generation of RS232 messages.
Another possible cause for a "COM TIMEOUT" message involves the identity of the RS232 pins. The RS232 pins called TX and RX are sometimes "swapped" on a DB9 or DB25 connector, because the terms TX and RX are "perspective sensitive"… the TX pin for a transmitting device connects to the RX pin for a receiving device. Sometimes this "swap" is performed inside the host computer… sometimes not. It may therefore be necessary to swap pins 2 and 3 on the DB9 or DB25 plug, to achieve DF operation.
INFO : The PicoDopp DF requires both connections only because the IBM TX pin is used as a source of negative voltage for the PicoDopp RS232 output…. it is otherwise ignored.
The true identity of these pins can also be determined experimentally with a DC voltmeter, ( if the COM port is turned on ) by looking for negative voltage on pin 2 or 3, with DB9 pin 5 = voltmeter ground. ( or DB25 pin 7 = voltmeter ground ) The RX pin should be nearly zero volts, the TX pin should be –3 to –25 volts. To avoid confusion, the RS232 connections on the PicoDopp MAIN board are labeled "232" ( for output data ) and "-V". ( negative supply voltage from host TX pin )
The PDA Display and IR Diode
The IR diode output is provided for users who wish to employ a PalmOS PDA for a cordless / handheld DF display, using the ( free ) PDA display program, available on this website. The output is current-limited, and can be connected directly to an IR diode. ( observe diode polarity )
The range and "degree of freedom" for the IR link depends heavily on the choice of the IR diode. IR diodes are available with a wide variety of beamwidths, ranging from a few degrees to many tens of degrees. Diodes with very narrow beamwidths will have the greatest range, but will require careful "aiming" of the LED, and very limited freedom of movement for the PDA display. Diodes with wide beam angles will yields the greatest degree of freedom, but with limited range.

Range will also be determined to some degree by the type of PDA employed, since there are no standards for range performance of IR data links. The location of the IR port on the PDA also varies from one type of PDA to the next, and deserves some consideration. Most IR ports are located somewhere on the top edge of the PDA, but not all… for example, the IR port on Visor Neo PDAs is located on the underside of the PDA, near the top edge, on the left side. It looks out "sideways" from the PDA ( and slightly down ) as a result.
For all PDAs, bright sunlight that shines directly on the IR port can defeat the data link. If the PDA suddenly fails to indicate a bearing, ( yet the signal is still present ) consider this possibility. The PicoDopp IR output can drive two LEDs if they are connected together in series. This raises the possibility of using two LEDs to provide overlapping coverage areas, should one LED prove inadequate.
The PicoDopp bench tests are performed with a Panasonic LN66A IR LED, which has a beamwidth of 22 degrees. This LED provides reasonable freedom of PDA movement, and a range of about 5 feet, using an old Palm M100 PDA for a display.
The Antenna Platform : Wideband Principles
The PicoDopp antenna described here should be suitable for use across multiple octaves of frequency range. The PicoDopp ANTENNA board is intended for use across the range of 100 MHz to 1 GHz, but operation outside these limits can reasonably be expected, and the exact limits can only be determined experimentally. RF sensitivity of the antenna is another matter… sensitivity will vary significantly with large frequency changes, but this can be compensated to some degree by using antenna elements of different length for specific bands. The information provided below is intended for people who anticipate using the PicoDopp across a multi-octave frequency range.
The upper frequency limit of operation for a Doppler antenna is fairly well-defined, and is determined by the separation distance between adjacent antenna elements, expressed in wavelengths. Distances exceeding 1/3 wavelength will begin to degrade the RF sensitivity of the antenna, and distance of ½ wavelength will definitely cause trouble. The reason involves the amount of RF phase "jump" that occurs when the DF switches from one antenna to the next. The receiver must "adjust" to the changes of ( input ) RF phase, and the Doppler pulses are created in the receiver as a "side effect" of the re-adjustment process.
For phase jumps exceeding 120 degrees, ( = 1/3 wavelength distance ) the amplitude of the RF signal will suffer some decay while the receiver "re-adjusts" to the new RF phase angle. For phase jumps of 180 degrees ( = ½ wavelength distance ) the RF signal will completely decay to zero amplitude, and then "re-appear" in the receiver, ( with reversed phase ) resulting in a "noise" pulse instead of a Doppler pulse.
The lower frequency limit is more nebulous and ill-defined. Strictly speaking, there is no true lower frequency "limit" for the operation of a Doppler. As the RF frequency descends, the size of the antenna ( expressed in wavelengths ) grows progressively smaller, yielding Doppler pulses of progressively smaller amplitude. The relationship is quite predictable and linear… cutting the RF frequency in half will cut the Doppler pulses in half also. ( because the antenna dimensions have been cut in half, expressed in wavelengths )
This can be compensated ( to some degree ) by increasing the audio level in the receiver, but there is a limit to this method… at some point, the audio level will be so great that serious distortion will result, either in the Doppler input circuits or in the audio output stages of the receiver. Therefore, the factors that determine the lower frequency limit are ( 1 ) The size of the antenna, expressed in wavelengths, ( 2 ) the maximum audio level that will not cause distortion, and ( 3 ) the minimum detection level of the Doppler DF.