New Axles & Brakes

Most Airstream owners’ cue to
replace their trailer’s Dura Torque axles is the visual evidence of the trailer
settling & covering too much of the tops of the tires. Confirmation comes after crawling underneath,
and finding positive angles on the torsion arms as mentioned in this vendor’s guide. As neither condition existed in my case, new
axles did not even make it to a to-do list until our third camping season, and
became a priority effectively because of a broken coffee cup.
Our last camping trip before
new axles was a long distance drive to the beach, and was different from most
others in that we ran out of time to stow all the clean clothes & opted to
leave them in laundry baskets atop the center twin beds. Arriving at our destination, I was annoyed to
find my Overlander’s interior looking like it had been ransacked. Sure, we had hit some rough stretches of
interstate, but the place should not have looked that bad. Even the pillows
had vibrated their way to the floor. Kim
was none too thrilled about the mess either as she ended up being the one that
had to refold everything. But, we just
cleaned up & stowed everything, and had a great time playing at the beach.
While the weather had been
fairly warm on our drive down to the beach, on our return home, it was just
plain hot. With the temperature near 100
degrees F, the mighty Suburban
started running out of cooling capacity for both its engine, and air
conditioning for us. Forced to limit
towing speed to around 62 mph, I had plenty of time to make a mental list of
all the early indicators of too much vibration in the Overlander – bulkhead
punched hole in ceiling (previous owner), wood partitions chafed at attachment
points, bathroom mirror won’t stay latched to the wall, storage bin door below
oven popped open again even after what I thought was an “end-all” fix, and a
total of six popped interior rivets in various locations. But even with all that, my mind was not made
up to order new axles until after we arrived home. While unloading gear, I found my favorite
[camping] coffee cup laying broken on the floor. While I do not know if vibration unlatched
the door on the overhead bin where the cup is normally stowed, regardless, the
cup should not have been able to bounce out.
It was obvious that it was time for “doubting Thomas” to make an exit.
 In the course of repacking the wheel bearings during
the refurbishment, I noticed the brake drums were manufactured out-of-round,
and suspected that they were probably also out-of-balance. Plans had been to replace them at some point
with modern-day castings since they were probably contributing to the
vibrations issues, but time just somehow never coincided with inclination. Now that the stars had aligned, I decided it
was best to order new, complete axles
wherein the axles show up with new brakes, drums, & everything.
In the course of repacking the wheel bearings during
the refurbishment, I noticed the brake drums were manufactured out-of-round,
and suspected that they were probably also out-of-balance. Plans had been to replace them at some point
with modern-day castings since they were probably contributing to the
vibrations issues, but time just somehow never coincided with inclination. Now that the stars had aligned, I decided it
was best to order new, complete axles
wherein the axles show up with new brakes, drums, & everything.
Talking to the Airstream
axle vendor over the telephone, I was advised that I could safely upgrade each
of my two 2800 pound axles to a 3000 pound load carrying capability, and I went
for it. He dismayed me though in that
while all the advertisements for his offering stated “OEM direct replacement”,
the new axles would have to have new, ½ inch holes drilled in the 3/16 inch
thick mounting plates to accept the new axles.
“But new ½ inch bolts are included in the purchase price.” I should have remembered that nothing is ever
easy. J
A week or so later, the
freight company called, and we made plans for me to pick up the new axles. Learning from others’ experiences with
accepting new axles, I measured the distance between my existing axles’
mounting flanges before leaving, and found the distance to be 58-3/16 inches.
Inspecting the two new axles
strapped together at the loading dock, I was surprised that the unprotected
wheel studs had survived transit without damage. Seeing the new ½ inch hardware in a bag taped
to one axle, and noting each axle’s load plate specified “3000 pounds”, I was
ready to take possession of the new axles until the distance between the
mounting flanges was found to be 61-1/4 inches.
Oops.
Later, while speaking to the
vendor on the phone, he was quite apologetic, and agreed that the wrong axles
had been shipped, “Yes, the distance between mounting flanges on a 1967
Airstream should be 57-7/8 inches. A
61-1/4 inch [unit] certainly will not fit”.
The problem now was that my existing axles were 5/16 inch wider than
what was supposed to be delivered.
Deciding to deal with this discrepancy at installation, I thanked the
vendor for his time & hung up.
 Round Two: The
new axles arrived (with wet paint, I might add) and did indeed measure 57-7/8
inches between flanges. Impressed that
new lug nuts had been screwed on & taped to the wheel studs, I took
possession of the new 3000 pound capacity axles even though this shipment had
been delivered without the promised ½ inch hardware.
Round Two: The
new axles arrived (with wet paint, I might add) and did indeed measure 57-7/8
inches between flanges. Impressed that
new lug nuts had been screwed on & taped to the wheel studs, I took
possession of the new 3000 pound capacity axles even though this shipment had
been delivered without the promised ½ inch hardware.
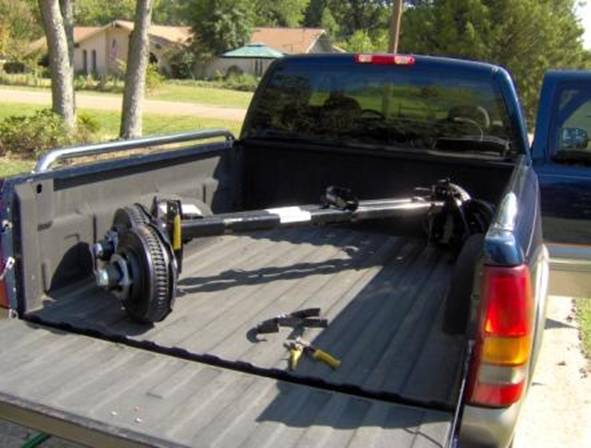
Now the fun could
start. Each of the two, complete axles
weighed in at roughly 50 pounds heavier than I am, and I do not own a forklift
like the freight company used to load them on my truck. My first thought was to get the kid next door
to help, but decided he might hurt himself lifting something the wrong
way. My second thought was to call up
some other guys, but all my heavy duty friends live at least 20 miles away, and
are middle-aged like I am. Not that they
would necessarily hurt themselves,
but anytime you get a bunch of guys together with the promise of free beer,
before long someone is going to say “Hey! Watch this!” and he is probably going
to get hurt.
So, while not ruling out the
possibility of eventually calling someone, the lure of safely offloading the
axles without disassembling them and/or damaging either me or the axles was
quite strong, and I decided to give it a shot.
The first hurdle was figuring out how to move the axles in the truck bed
since the rubberized bed liner precluded scooting them.
Luckily, the hurdle turned
out to be easy enough to clear. After
cutting the straps holding the two axles together, a small four-wheel dolly was
placed under the hub at the front of the bed.
Remembering to lift with my legs instead of my back, it was a piece of
cake – I just walked backwards carrying one end until the end could be set on
the concrete drive. After a short rest, ![]() the end
sitting on the tailgate was lowered to the ground. After that, my service jack was used to move
each axle around.
the end
sitting on the tailgate was lowered to the ground. After that, my service jack was used to move
each axle around.
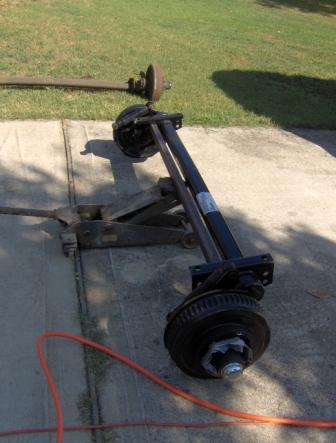
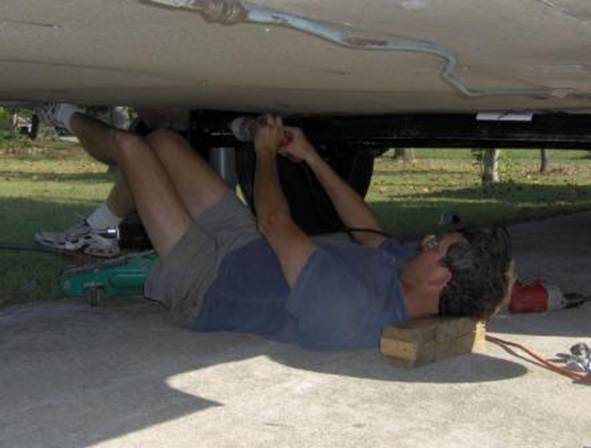
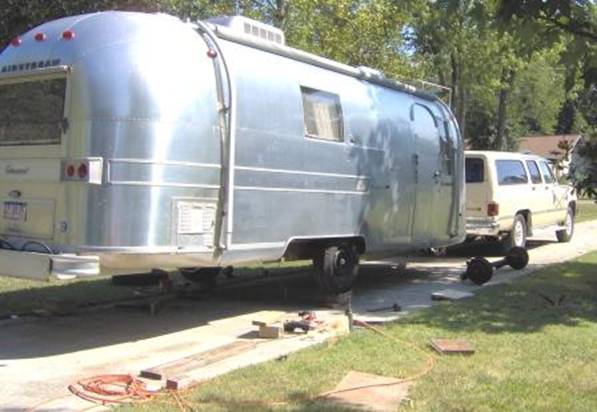
With the new axles sitting safely
on the concrete, my attention shifted to removing the old ones. Positioning the service jack underneath the
forward axle, I thought that once the four securing bolts were removed, the
axle would just drop out. And, since an
impact wrench was on hand to either loosen the bolts or break them while
trying, I thought the whole operation would be done in minutes.
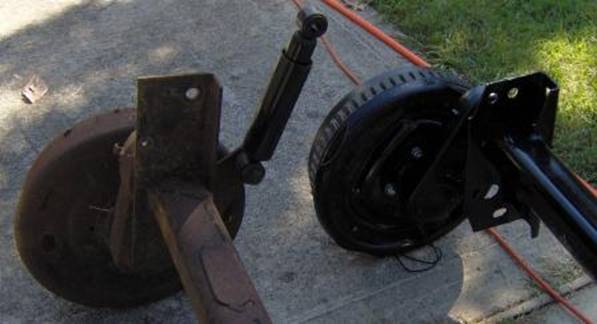
Well, there’s nothing like new hurdles – The torsion arms had taken
a set instead of dropping down after the Airstream’s weight was totally supported
the on the other axle. As a consequence,
one of the 5/8 inch mounting bolts became trapped between the arm and
frame. Fortunately, Mr. Super Sawzall was up to the challenge,
and only one bolt had to be purchased.
The other hurdle encountered
was that the original axles had been jammed into place, and took some serious
prying with a two foot crowbar to remove.
It appears that my 1967 Airstream was indeed designed to accommodate an
axle with the dimensions quoted by the axle vendor. For whatever reason though, the factory
decided to cram the wrong axle in. I
can’t say that it necessarily hurt anything, but I was extremely happy that the
new axles slipped right into place without unusual effort.
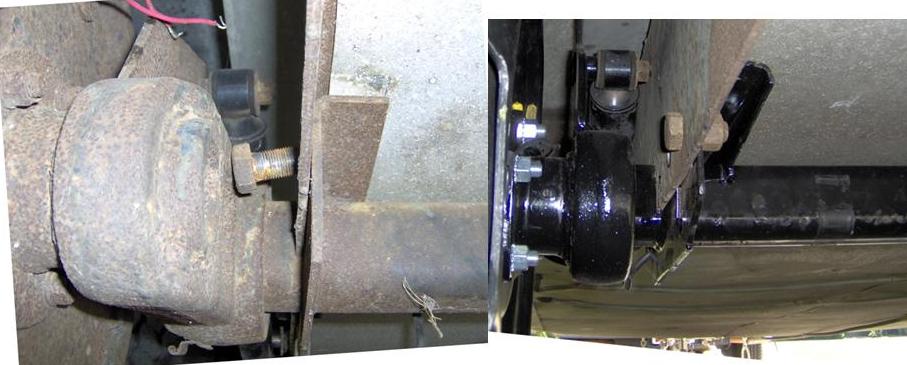
While the service jack had
no problem moving the new axle’s weight around, its basically flat jack plate
was not designed to lift the new axle up with the square axle tube rotated to
the correct orientation. Luckily, I had
a length of 2-inch box bar which could be taped into place at a particular
location on the axle flanges and effectively relocate each axle’s center of
gravity with respect to the jack.
Jacking on the box bar instead of the axle itself allowed the axle to go
up in the right orientation.
These particular axles were custom-made to order by Henschen, who
was Airstream’s original supplier in 1967.
I could have gone with Dexter brand axles, but to be quite honest, it
was going to require a lot of time I did not have (nor was inclined to make) to
research & specify dimensions, and a hassle factor which, I was under the
impression, could be avoided by dumping money on the project in the order of
twice the axles’ actual value. Up until
the point I had to drill the holes necessary to mount the new axles, the actual
dollar value of the amount of money spent had been destined to fade away as a
cost of doing things the easy way.
 But I can not get over the fact that the original
axle flanges were simple pieces of angle iron, and the axles most likely
arrived at Airstream’s factory with 5/8 inch holes predrilled in the
flanges. Since my Henschen axle was
custom-built especially for my Overlander, with the amount of money I paid for
the easy way, it does not seem to be asking that much to have the original
style flanges with pre-drilled holes welded on to start with. And, while I’m wound up, the non-supplied
mounting hardware was slated to be of the ½ inch variety whereas every single
one of the holes on the new flanges was 5/8 inch or bigger. What would have been wrong with supplying the
correct-size hardware?
But I can not get over the fact that the original
axle flanges were simple pieces of angle iron, and the axles most likely
arrived at Airstream’s factory with 5/8 inch holes predrilled in the
flanges. Since my Henschen axle was
custom-built especially for my Overlander, with the amount of money I paid for
the easy way, it does not seem to be asking that much to have the original
style flanges with pre-drilled holes welded on to start with. And, while I’m wound up, the non-supplied
mounting hardware was slated to be of the ½ inch variety whereas every single
one of the holes on the new flanges was 5/8 inch or bigger. What would have been wrong with supplying the
correct-size hardware? ![]()
Can ya tell I don’t want to admit that I am getting too old to
enjoy lying on my back working hard? ![]() I thought about discussing my concerns with
the axle vendor, but, between you and me, I get the impression he already has a
sufficient number of people suggesting product improvement ideas. So I think I will just spare him mine.
I thought about discussing my concerns with
the axle vendor, but, between you and me, I get the impression he already has a
sufficient number of people suggesting product improvement ideas. So I think I will just spare him mine. ![]()
On the flip side of my rant,
if I had had Dexter or someone else custom make my axles, I would have probably
encountered the same flange bolt hole issues.
But what I would have definitely
encountered was axles that needed to be jammed into location as I would have
had the mounting flanges welded onto the new axles placed exactly where the old
ones were.
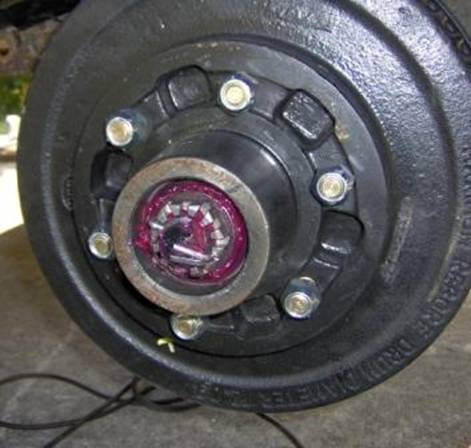 I have read that Henschen Axle and Airstream Inc.
parted ways a year or two ago after some new Airstreams started loosing entire
wheel/hub assemblies on the road due to an insufficient amount of wheel bearing
grease being installed at the axle factory.
From the accounts I read, it did not appear to be a poor workmanship
issue, but rather a design change based on customer reports of too much grease
being packed in some hubs. Although the
issue reportedly has been resolved, just to be on the safe side, I pulled the
dust caps off just to make sure I could see grease. I’m good to go.
I have read that Henschen Axle and Airstream Inc.
parted ways a year or two ago after some new Airstreams started loosing entire
wheel/hub assemblies on the road due to an insufficient amount of wheel bearing
grease being installed at the axle factory.
From the accounts I read, it did not appear to be a poor workmanship
issue, but rather a design change based on customer reports of too much grease
being packed in some hubs. Although the
issue reportedly has been resolved, just to be on the safe side, I pulled the
dust caps off just to make sure I could see grease. I’m good to go.
The last hurdle to be
cleared was getting rid of the old axles.
Although the city is pretty good about picking up everything I leave on
the curb, they do have guidelines, and I rarely leave anything out that weighs
more than 30-40 pounds. Even with
stripping the old axles, there was going to be some heavy stuff lying out
unless I wanted to get busy with the Sawzall.
Luckily, I remembered there was a metal recycling facility in town. So I loaded the old axles & some old,
loaded backing plates up and stopped by the recyclers on lunch break one day. Although I would have been content to just to
get rid of the stuff, the recyclers gave me $21.60 for 480 pounds of scrap iron
and unloaded it for me. ![]()
I have every confidence that
my Airstream is now better off than it was.
The test will come in about two weeks when we head to
Update:
As you can read in the tale
about setting up my Reese
Dual Cam hitch, the old axles were not the only thing I thought might be
rattling the Overlander & its contents.
Although I had not planned to test out new axles and hitch improvements
simultaneously, time was running short on getting ready for Disney World, and
that is what I ended up doing. So I
can’t say all aspects of my ultimately improved ride are attributable to the
new axles. The ride certainly did not
start out looking improved, though.
Between trips, my Airstream
always sits ready to go with an empty black tank, and a generally full water
tank. Add food & clothes and we’re
gone. Since this also seemed like an
adequate load status for the 60 mile, new axle shakedown trip, after swapping
spring bars I hit the road.
At the turnaround point, I
noticed the forward axle tires running slightly warmer than the aft, and
attributed it to the Airstream being pitched slightly forward due to the hitch height
being unchanged in spite of the 1-1/4 inches of Airstream height gained by the
new axles. Opening the door, I found the
bathroom mirror swinging freely, one of the lower cabinet doors lying open, and
a dish towel lying on the floor instead of laying flat on the cook top where it
had been left. While there were no
popped rivet heads scattered about, it was obvious that my vibration issues
were still present. I returned home NOT
a happy camper.
Back in the driveway, all
wheels were checked for loose bearings hot/cold drums, and the like. Finding nothing amiss, efforts were
concentrated on getting the new hitch height & spring bars dialed in. Other than going around the block a few times
to get the cam saddles properly adjusted, the Overlander sat for the next week
or so until we left for
Even though we always stay
at campgrounds with a minimum of water & power, I had been towing with a
full water tank since the resulting weight at the tank’s forward location
softened the ride when I was using too-stout spring bars. Now that the proper bars were installed, the
30 gallon tank was drained to around 10 gallons as, with small children, we
have appreciated having a bathroom with us while on the road.
Our first stop did not occur
for a hundred or so miles, and I was somewhat shocked to find everything inside
the Overlander riding extremely well. This trend continued for the remainder of the
trip leaving me feeling significantly better about the decision to purchase new
axles.
After further consideration,
I believe that the Airstream benefited from the deadweight of a week’s worth of
breakfast & clothes for a family of four.
The additional weight pre-loaded the suspension system, and helped it
work more like it was designed to.
Remember the axles’ total weight carrying capability was upgraded an
additional 400 pounds even though we had never carried very much stuff to start
with.
Something else noticed about
the axles is that there is not much difference in the new torsion arms’ angle between loaded (wheel on ground) &
unloaded (wheel off ground). This was
especially evident when I had to cross over a two-inch high concrete median
divider while exiting a gas station – one tire was suspended in air when the
other tire climbed the obstacle. Since
the owner’s manual indicates that a six inch high tire ramp is needed to change
a flat, many people consider axles bad when one wheel can spin freely while the
other wheel is anything less than six inches off the ground.
In retrospect, I wish had
first gone on a long distance trip with only the hitch improvements just so its
contribution could be gauged. But
ultimately, everything done this year on the hitch & running gear has
definitely benefited my Airstream in one way or another.