Bay Breeze Compressor Replacement
 If you
have read my other webpages, you know that I prefer to fix everything I can
myself. While foremost is the satisfaction I get from doing the work myself, I
also know exactly who to blame for poor workmanship.
If you
have read my other webpages, you know that I prefer to fix everything I can
myself. While foremost is the satisfaction I get from doing the work myself, I
also know exactly who to blame for poor workmanship. ![]() Unfortunately,
between the certifications needed to purchase Freon-22, and the myriad of
special tools needed for refrigeration work, servicing the pressurized portion
of an air conditioning system is something I just can not do. But for my
latest Airstream repair, there ended up being a lot of small tasks before,
during, and after the new compressor’s installation I handled which made my
HVAC service technician’s life easier, his time there $shorter$, and improved
the overall quality of the work done.
Unfortunately,
between the certifications needed to purchase Freon-22, and the myriad of
special tools needed for refrigeration work, servicing the pressurized portion
of an air conditioning system is something I just can not do. But for my
latest Airstream repair, there ended up being a lot of small tasks before,
during, and after the new compressor’s installation I handled which made my
HVAC service technician’s life easier, his time there $shorter$, and improved
the overall quality of the work done.
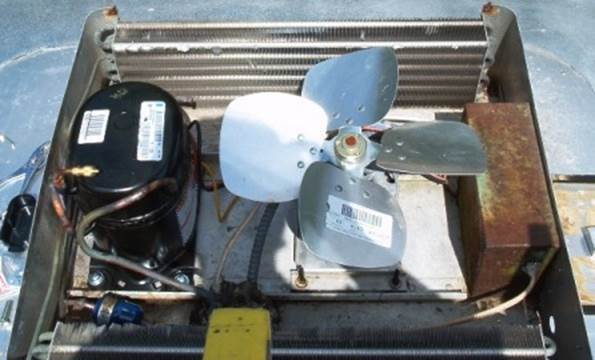
 Step 1: Identify the problem. This was the
easiest part of the entire saga. Setting up camp at a state park in
Tennessee, the air conditioner produced no cold air even though the compressor
could be heard running albeit softer than normal. I figured the receiver-dryer
had finally rusted away enough to let the Freon leak out as, after the fan
motor, it was worst looking part of the system.
Step 1: Identify the problem. This was the
easiest part of the entire saga. Setting up camp at a state park in
Tennessee, the air conditioner produced no cold air even though the compressor
could be heard running albeit softer than normal. I figured the receiver-dryer
had finally rusted away enough to let the Freon leak out as, after the fan
motor, it was worst looking part of the system.
Step 2: Find an HVAC service technician willing to work on the unit. This was the most exasperating part of the return-to-service effort. From what I have read, RV service centers, Airstream included, seldom service an A/C unit preferring instead to replace the entire unit. With what ended up needing attention on my unit, cost-wise, replacement would have been a viable option my unit was constructed like RV A/Cs are made nowadays. Modern day units are of a one-piece construction, and sit entirely on the roof servicing the interior by means of one 14 inch square hole in the roof. My unit has inside & outside components which connect to each other by one fanshaft sized hole, and one hole big enough to pass Freon & electrical lines through. Between reading that my unit was worth repairing, and the angst level involved in removing it, cutting a big gaping hole in the roof, and mounting a new RV A/C, I opted for “repair if at all possible”.
Although being a homeowner since 1989, I have never needed any work done which involved Freon. As a consequence, my search for a service person started in the Yellow Pages. I thought it would be a simple task after I explained that my RV A/C, like regular home A/Cs, uses Freon-22. Most of the people I spoke with on the phone would not even let me get that far before saying “No!”. Some were even rude about it. So I put the phone book back in the drawer, and drove down to an HVAC supply house, and outlined what I was looking to get done to the man behind the counter. Sure enough (I could almost see a bulb light up over his head) he knew a guy who would treat the job like it ought to be treated… just another job fixing a refrigeration system.
 Johnny Moseley, of Moseley’s Heating
& Cooling, showed up the next day with gauges & Freon sniffer in hand.
Seeing as how the system had worked just fine three or four weeks earlier, we
were both surprised that he had to charge the system slightly just to get any
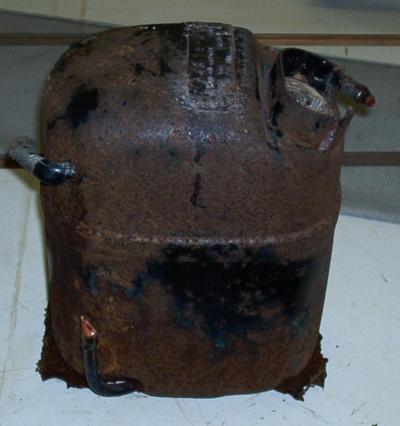
Freon to sniff for. But talk about leaks! Almost the entire lower surface of
compressor sent his sniffer into a tizzy. Although the Receiver-Drier had
almost the same effect, its condition became a moot point because the R-D is
always replaced when the compressor is. Johnny also soaped the compressor
& R-D, but none of the leaks were big enough to blow bubbles. Since all
the coils & copper lines sniffed okay, I felt pretty good about proceeding
with the repair.
Johnny Moseley, of Moseley’s Heating
& Cooling, showed up the next day with gauges & Freon sniffer in hand.
Seeing as how the system had worked just fine three or four weeks earlier, we
were both surprised that he had to charge the system slightly just to get any
Freon to sniff for. But talk about leaks! Almost the entire lower surface of
compressor sent his sniffer into a tizzy. Although the Receiver-Drier had
almost the same effect, its condition became a moot point because the R-D is
always replaced when the compressor is. Johnny also soaped the compressor
& R-D, but none of the leaks were big enough to blow bubbles. Since all
the coils & copper lines sniffed okay, I felt pretty good about proceeding
with the repair.
I still can’t get over how much use this compressor gave me. Up until this time last year, all the topside components had been covered for 23 years or so by wet pine straw. So it was no mystery as to why everything was rusted as badly as it was. I was incredulous last year when replacing the fan motor that the compressor had any Freon in it, let alone worked. So I have no complaints about the compressor’s service life.
 Step 3: Decide on replacement parts, and who
buys them. Most Airstream enthusiasts seem to agree that the Armstrong Furnace
Company used an 11,000 Btu compressor in the Bay Breeze units manufactured for
Overlanders in 1967. Unfortunately, Tecumseh (OEM) no longer makes this size
compressor. Present day choices are limited to 10k & 12k Btus. Advising
Johnny of this, I asked him to round up all parts necessary to make my unit
blow cold air again. No problem there. After looking at the rusted-up
condition of the four mounting points, he also had no problem with cutting the
Freon lines to allow me to remove the old compressor, and prep the mounts for a
new one. Actually, I think he was relieved – We both knew the mounting nuts
were going to snap off; and I knew my labor was a lot cheaper than his
overcoming this particular problem.
Step 3: Decide on replacement parts, and who
buys them. Most Airstream enthusiasts seem to agree that the Armstrong Furnace
Company used an 11,000 Btu compressor in the Bay Breeze units manufactured for
Overlanders in 1967. Unfortunately, Tecumseh (OEM) no longer makes this size
compressor. Present day choices are limited to 10k & 12k Btus. Advising
Johnny of this, I asked him to round up all parts necessary to make my unit
blow cold air again. No problem there. After looking at the rusted-up
condition of the four mounting points, he also had no problem with cutting the
Freon lines to allow me to remove the old compressor, and prep the mounts for a
new one. Actually, I think he was relieved – We both knew the mounting nuts
were going to snap off; and I knew my labor was a lot cheaper than his
overcoming this particular problem. ![]()
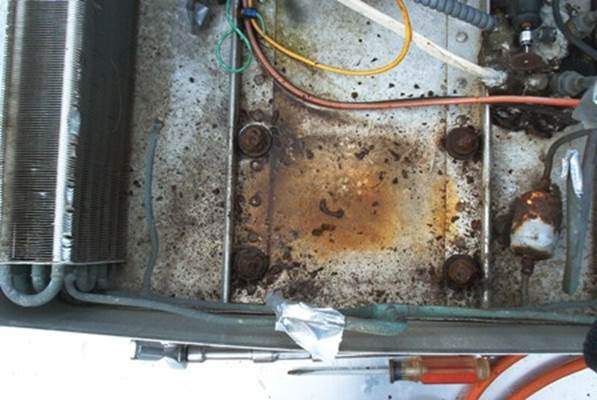 Step 4: Prep for new compressor. Well, the
square nuts did not snap off…immediately. The stud and all free-wheeled in
place
Step 4: Prep for new compressor. Well, the
square nuts did not snap off…immediately. The stud and all free-wheeled in
place ![]() . BTW, have you tried lately to
find an 8-point socket to loosen 4-flat nuts? All that work for nothing.
. BTW, have you tried lately to
find an 8-point socket to loosen 4-flat nuts? All that work for nothing. ![]()
Plan 2: Dremel tool. Not enough room.
Plan
3: Brute force ![]() . Noticing that the compressor’s
baseplate was also incredibly rusted, I yerked the compressor to the left, then
to the right, then front, den back; And anudder one, and anudder one! The
compressor was out before the end of round 1.
. Noticing that the compressor’s
baseplate was also incredibly rusted, I yerked the compressor to the left, then
to the right, then front, den back; And anudder one, and anudder one! The
compressor was out before the end of round 1.
Cutting the rubber bushing off of its bushing, I was able to lock Vicegrips on it, and then break three of the four studs off just below the mounting bolts. I must be getting better – I expected to break all four!
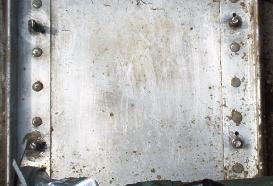 The studs appeared to be the threaded
part of a 5/16-20 elevator bolt. So, to solve the free-wheeling issue, 1/8
inch D holes were drilled, and the hardware secured with cut off steel nails
and JBWeld.
The studs appeared to be the threaded
part of a 5/16-20 elevator bolt. So, to solve the free-wheeling issue, 1/8
inch D holes were drilled, and the hardware secured with cut off steel nails
and JBWeld.
Rummaging around my miscellaneous nuts & bolts box, I found, what I will call “cap nuts with an extended, threaded collar” to use to make up for the portion of the stud which left with the nut. I was glad to identify this solution, as Johnny’s solution involved the use of 3/8 inch D, self-tapping sheet metal screws. From a leak path perspective, I was not real keen on it. I could have done what I did for the fan motor mounts, but Johnny appeared to share my enthusiasm for my approach.
 Step 5: Call Johnny back. After his initial
visit, Johnny advised me he would be out of time for a week, so I knew camping
was out for a while. When he got back in town, he had a week’s worth or
“regulars” to handle before me. It was a rough two weeks waiting to go camping
again!. He did, however, keep me posted on the phone, so I knew he hadn’t
forgot about me.
Step 5: Call Johnny back. After his initial
visit, Johnny advised me he would be out of time for a week, so I knew camping
was out for a while. When he got back in town, he had a week’s worth or
“regulars” to handle before me. It was a rough two weeks waiting to go camping
again!. He did, however, keep me posted on the phone, so I knew he hadn’t
forgot about me.
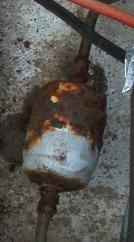
The new compressor, although a 1000 Btus stronger, was smaller than the original one. Even though it too was made by Tecumseh, you would never know it by the way both the electrical, and Freon connections were arranged. The new capacitor was also less than half the size of the old one. BTW, if you plan to purchase your own compressor, the mounting plate is sold separately from the compressor, and not welded to the can like days of old. Come to find out, though, the receiver-dryer is still a stock, common part.
 The installation went fairly smooth
although it took close to three hours of labor to accomplish the installation.
The bulk of that time was making or arranging plumbing fittings to line the modern
day compressor up with the existing plumbing. I have no qualms about any of
the work Johnny did, and would recommend him to you (Johnny’s number is (256)
990-2587) if you live in North Alabama.
The installation went fairly smooth
although it took close to three hours of labor to accomplish the installation.
The bulk of that time was making or arranging plumbing fittings to line the modern
day compressor up with the existing plumbing. I have no qualms about any of
the work Johnny did, and would recommend him to you (Johnny’s number is (256)
990-2587) if you live in North Alabama.
I
have been trying, both in my mind, and on the Internet, to figure out the
consequences of using a compressor rated roughly 8% higher in Btus than my old
one. Additional cooling will not happen in any significance because my coils,
capillary tube, and airflow are not rated for the extra capacity. Since Johnny’s
gauges indicated system pressures on par with what was to be expected out of
the old compressor, I assume that the new compressor has some sort of internal
relief valve which effectively vents the extra Btus internally without ever
taking advantage of their cooling potential. I don’t know. If you do, please
feel to share the correct answer with me. ![]()
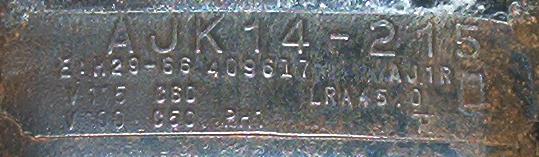
Miscellaneous: Old compressor: AJK14-215; New compressor: AK111AT-004-J7