Sam Buchanan's Strip Canoe Project
Sam's Construction Log, page six
9/27/00
The end is in sight!
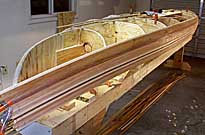
A couple of clear red oak boards were procured from the local lumber emporium for the wood work on our strip canoe. The oak had been planed to 3/4" thick, so all that was necessary was to rip the appropriate sticks out of the planks using a table saw.

Since the oak plank was only 12' long, I had to scarf two strips together to make sticks
long enough for the gunwales. Two strips with matching grain patterns were overlapped and
sawed simutaneously so the scarf joints would match reasonably well.

After carefully adjusting the joints with a sanding block, the strips were joined with
TiteBond waterproof glue and clamped for drying. After sanding and minor filling, the
joints will be nearly invisible.
It is difficult to find planks 18' long so one-piece gunwales could be fashioned. The scarfed sticks will work just fine.

The thwarts and yoke were cut from oak with a power saber saw. All that remians at this
point is to shape the edges of the pieces.
The inside of the hull is dull because the varnish has not yet been applied.
10/2/00

I decided to make the decks out of cedar strips. A "beam" was built up out of five strips of various shades to serve as the main load carrying member of the deck. I had already installed oak carry thwarts and the deck beam tied into the thwarts.
Here you see the bow deck under construction.

This is the unvarnished deck.
The carry thwart is a two-piece unit that ties into the bottom of the gunwales......should be very secure for tie-down purposes.

The seats are "caned" with a plastic webbing that is 7/8" wide. Stainless screws and washers hold the webbing in place on the bottom of the oak seat frames.

Here is the stern seat. Oak spacers are used to set the seat below the gunwale. Four inch bolts support the seats except at the aft position of the stern seat which requires two six inch bolts.

I may remove the forward gunwale if it interferes with using the bow seat for solo paddling.

Update:
The plastic webbing has been replaced with plastic cane from H. H. Perkins Co. I used the instructions in the Gilpatrick book, and the caning process went very nicely in spite of being quite labor intensive. I used the "medium" cane, and a 500' shank should be enough for three, maybe four, seats.
The results are worth the effort, however!

You gotta have some way to haul the canoe. This is a tiny four-foot-wide "knock-down kit" that I converted into a canoe trailer. A 13' tongue replaced the original unit, and oak racks were added to carry the canoe.

Detail of forward rack. Padding is foam pipe insulation.


Ready for the water!

10/15/00; Canoe project is completed.
10/21/00: First trials!

Sam's Laker makes first run with help from Melanie Buchanan. Canoe project is deemed a great success.......and we are off to the water!

Stability of the Laker is very good and the canoe is well suited to family use. It should be capable of hauling a huge load.