Go on to the tie tack
Back to the main tie page
How to Tie a Necktie
Have you ever wanted to tie your own necktie without asking for help? You
will. And the company that will bring it to you is AT&T.
Introduction
Many people have asked me how to tie a necktie, and most (if not all) of
them have internet access. I thought people might appreciate a set of instructions
for tying neckties.
There are a great many ways to tie a necktie (I've heard of three). You're reading instructions for the four-in-hand knot. Others are the Windsor
and Double Windsor.
The pictures here were taken on a Silicon Graphics O2 workstation with it's
standard camera. I didn't take a lot of time on it, so some of the images
are a little bit out of focus, but I think you can still tell what's going
on.
Getting Started
All of the pictures have been flipped horizontally to make them look as
if they were in a mirror. Imagine me standing next to you in the mirror,
then watch what I do, and do it yourself. Many people tie neckties in mirrors.
(It's a good thing I don't need one because the video feedback from the
O2 camera is not a mirror image!)
I'm right handed. I will occaisionally mention which hand to use for a task.
You can tie a mirror image of this knot, and it will look just fine, but
to do so, you must use the other hand. When I tie a tie, I use my right
hand for manipulating the tie, and my left hand for holding things in place.
In most of these pictures, I'm just holding something in place (and using
the other hand to take a picture).
Do not expect to tie a perfect knot on the first try. The first time I went
through these pictures, I wound up with the wide end too high and the narrow
end too low. If you've never tied a necktie before, you may have trouble
with the knot concepts or holding things just right as you tie the knot.
Try it and be patient. If at first you don't succeed, try and try again.
Tying the Four-in-Hand Knot
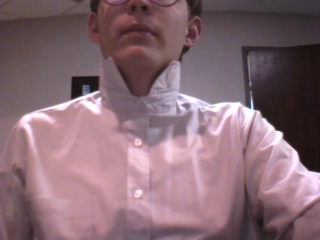 Put on a round-neck (as opposed to V-neck) T-shirt, and a dress shirt. Button
even the top button on the dress shirt. Turn your collar up. [If the images are too dark to see, try calibrating your monitor.]
Put on a round-neck (as opposed to V-neck) T-shirt, and a dress shirt. Button
even the top button on the dress shirt. Turn your collar up. [If the images are too dark to see, try calibrating your monitor.]
 Place the tie around your collar with the seam of the tie facing you. Note
the lengths of the wide and narrow sides of the tie and how low each comes.
Check to be sure the tie is not twisted behind your neck.
Place the tie around your collar with the seam of the tie facing you. Note
the lengths of the wide and narrow sides of the tie and how low each comes.
Check to be sure the tie is not twisted behind your neck.
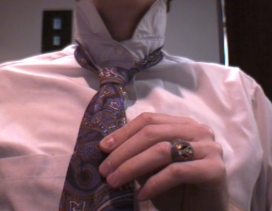
 Cross the wide side of the tie over the narrow side of the tie about 2cm
down from your top button, and hold them in place.
Cross the wide side of the tie over the narrow side of the tie about 2cm
down from your top button, and hold them in place.
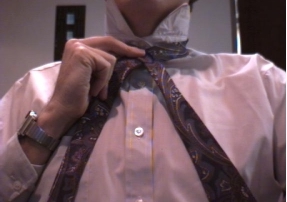
 Pass the wide part of the tie around behind the narrow part. The seam on
the wide part of the tie should be facing away from you. Note that I have
my left index and middle fingers pointing up on top of the cross, and my thumb beneath
it and touching my shirt. (The other two fingers are out of the way).
Pass the wide part of the tie around behind the narrow part. The seam on
the wide part of the tie should be facing away from you. Note that I have
my left index and middle fingers pointing up on top of the cross, and my thumb beneath
it and touching my shirt. (The other two fingers are out of the way).
 Bring the wide part of the tie across in front of the narrow part. Keep
your left hand's fingers where they were before, and they will reserve a
space for the wide part of the tie (in step 7). The seam on the wide part
of the tie should be facing towards you.
Bring the wide part of the tie across in front of the narrow part. Keep
your left hand's fingers where they were before, and they will reserve a
space for the wide part of the tie (in step 7). The seam on the wide part
of the tie should be facing towards you.
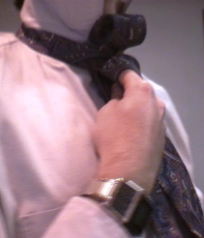
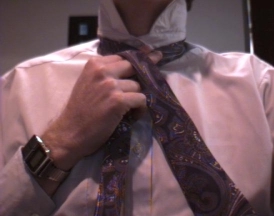
 Bring the wide part of the tie up between your thumb and shirt. The wide part of the tie goes behind the knot, then above the knot, then it drapes down in front of the knot. Don't twist the tie during this process - keep it flat except for the perscribed turns.
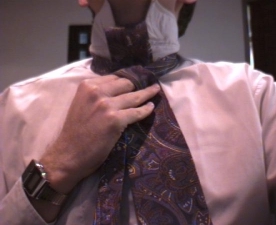
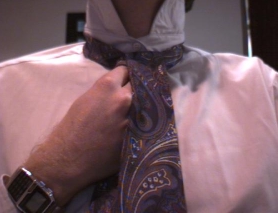
 Put the wide part of the tie through the loop you've been holding with your
two fingers since step 5.
Put the wide part of the tie through the loop you've been holding with your
two fingers since step 5.
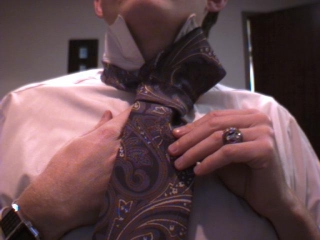
 Pull the wide part of the tie tight.
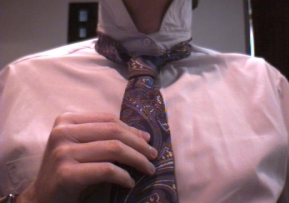
 To make a smaller knot, pull the wide part of the tie tighter.
 To move the knot closer to your neck, pull on the narrow end of the tie
and slide the knot up.
To move the knot closer to your neck, pull on the narrow end of the tie
and slide the knot up.
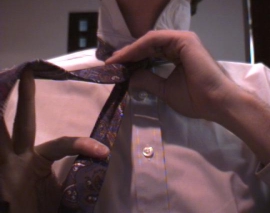
 Turn the bottom of the tie up and note the tag.
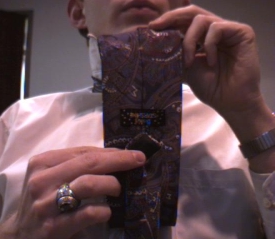 Slip the narrow end of the tie through the tag. This will keep the parts
from flopping around independently.
Slip the narrow end of the tie through the tag. This will keep the parts
from flopping around independently.
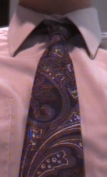 Neaten the knot, and you're presentable. If you have a tie tack (sometimes
called a tie pin), instructions follow.
Neaten the knot, and you're presentable. If you have a tie tack (sometimes
called a tie pin), instructions follow.
Go on to the tie tack
Back to the main tie page
Questions? Comments? Send them to me: jimes@hiwaay.net
 ties tied since 2001-02-01 13:55 GMT
This site is free, and I don't figure I could find a way to charge money for it, but if you've got your tie on straight, and if
you want to help, here's an easy way you can donate $5 to offset the costs of running the site. (FYI, hosting is about $60/year and I received $15 between August 2002 and May 2003.) Thanks for stopping by!
|
|